

Have you noticed when you visit the Wikipedia page, sometimes it shows you a small popup card with brief information about the word or term if you hover the mouse over it? Something like this:

That looks informative, right?
The same functionality now you can also apply to your WordPress site and help your visitors to digest information from your site more easily.
This feature on your site can help your visitors to learn quickly about a word without visiting another page about that particular word or term.
The easiest and recommended way to achieve this on a WordPress site is by using a WordPress plugin that should add this feature for mobile devices as well.
There are a few WordPress plugins available that can help you add this functionality to your site.
I have tested those plugins and sorted the best ones for you.
As a first step, for all the plugins, the common part is their installation on your site from the WordPress plugin directory.
If you need help installing the plugins, you can check our detailed guide on installing a WordPress plugin with simple steps.
Let’s start exploring how different plugins can help to add this feature to your site!
Contents
Best Plugins That Provide Feature to Add Popup Card for a Word or Term
Here, I have listed some of the best plugins that can help you to show a popup if you hover the mouse over a word or term (just like Wikipedia).
These plugins are also friendly to mobile devices, so you can use them confidently without disturbing the site experience for your mobile visitors.
1. WordPress.org Glossary
WordPress.org Glossary plugin is best for you if you are looking for a very simple and lightweight plugin to apply a popup feature like Wikipedia for a word or term.
In fact, WordPress.org also uses this plugin on some of its pages to provide the best experience for its visitors and contributors.
Once you will activate this plugin, it will create a Glossary option in the left sidebar of the WordPress admin dashboard.
Then you can add a new term and its description by going to Glossary » Add New option.

Once you add a term, it will automatically start to get reflected on your site for matching terms or words on your posts, pages, comments, etc.
And whenever you hover the mouse over the term on your site, it will show a small popup with additional information about the term.

Now if you have a matching term, for example, the matching term for Web Browser could be Browser, Browsers, Web Browsers.
So you don’t need to add these separately in a new entry, and you can add them all in the same entry in the Alternate Names section at the time of adding a new term by going to Glossary » Add New or by editing the existing one.
If you have more than one word to add, then separate them with a comma (,).

Once added, whenever the WordPress.org Glossary plugin will see the matching terms on your site, it will automatically show the same popup with the information there.
You can install this plugin on your site if you want something simple that should also look good to your visitors in appearance.
What if you already have a link for a term on the site?
If you have set the description for a term to show a popup for it, and at the same time, if you have a link for the same term on any page, post, or comment, then the plugin will automatically remove the popup feature from that term, and the link will be given priority.
That means your link will not get disturbed or captured by the popup function, and it will work as usual.
Does WordPress.org Glossary work on mobile devices?
I tested the plugin for mobile devices, and it works perfectly there.
However, the hover functionality is not possible on mobile devices, so you will need to click on the term to see the popup having information for the term.
2. Wikipedia Preview
The next on our list is Wikipedia Preview.
This plugin is made by the Wikimedia Foundation, which runs one of the largest nonprofit sites, Wikipedia.
As the plugin’s name provides a hint of its feature, it also shows a popup card if you hover the mouse over a term on your site.
But, it works a little different way.
In the last plugin, I showed you that, only if you add a description for a term on your site, then the information for the same will get reflected on your site as a popup.
But if you do not want to add a description for a term or word on your site and still want to show a popup, then this plugin is for you.
This plugin integrates with Wikipedia’s API to get information and displays a brief summary of the article on your site, along with a thumbnail image, if available.

To show the popup for a term with information from Wikipedia:
- After installation of the plugin, you will need to go to the site’s post/page WordPress editor.
- Select a term for which you want to add a popup.
- In the toolbar, click the More (
⌄) icon and select Wikipedia Preview. - After that, the Wikipedia Preview setting box will appear, where you can search for the best matching article from the Wikipedia database for your term and click to add it to the term on your site.
- Finally, click the Update/Publish button to save the changes you made on the editor.

I have made a small video as well to make the above steps easier for you to understand, which you can check here.
This plugin also supports languages other than English.
So if your site is in a different language, you can check the article available for that language you want and then add it.
What if you already have a link for a term on the site?
With this plugin, on your site, you can’t have both a Wikipedia popup and a link (to a different page) for the same term.
But as we saw above, if you apply a popup for a term/word on a post, it will not affect the same term on your other posts unless you apply the popup there as well from the editor.
Does Wikipedia Preview work on mobile devices?
I tested this plugin for mobile devices, and it works perfectly there.
However, the hover feature is not available on mobile devices, so you must click on a term to see the popup with the term’s definition.
3. Glossary
Glossary is another plugin in this list that can help you to add a popup for a term with brief information about it.
Once you activate the plugin, you can add the description for a term by going to Glossary » Add New option, available in the left sidebar of the WordPress admin dashboard.

There are settings changes required in the plugin to display popup for a term.
Let’s see what those settings are that you will need to change:
Required settings change:
After you add a term, go to Glossary » Settings and enable the Post (at least) and Page options.

Then scroll down on the same page, and in Enable tooltips on terms, select Link and Tooltip.

The Link and Tooltip option will add both popup (Tooltip) and a direct link to the public page where you have the description for the term on your site.
If you want to show only the popup (Tooltip) and not the Link option, then you can purchase the paid plan of the Glossary plugin, as this feature is only available in the paid version of the plugin.
Optional settings change:
Below I have mentioned some optional settings changes that you can skip.
But if you want a simple popup, just like I have shown for this plugin above in the screenshot, you can consider changing the settings mentioned below.
On the same settings page, in the Tooltip style, select Simple if you want to show the background color of the popup as white.

Scroll down more on the same settings page, and in Excerpt length in characters or words, change the value to 0 if you don’t want to limit the character length for the description that the popup displays for a term.
Or you can also increase/decrease the value as per your preference.
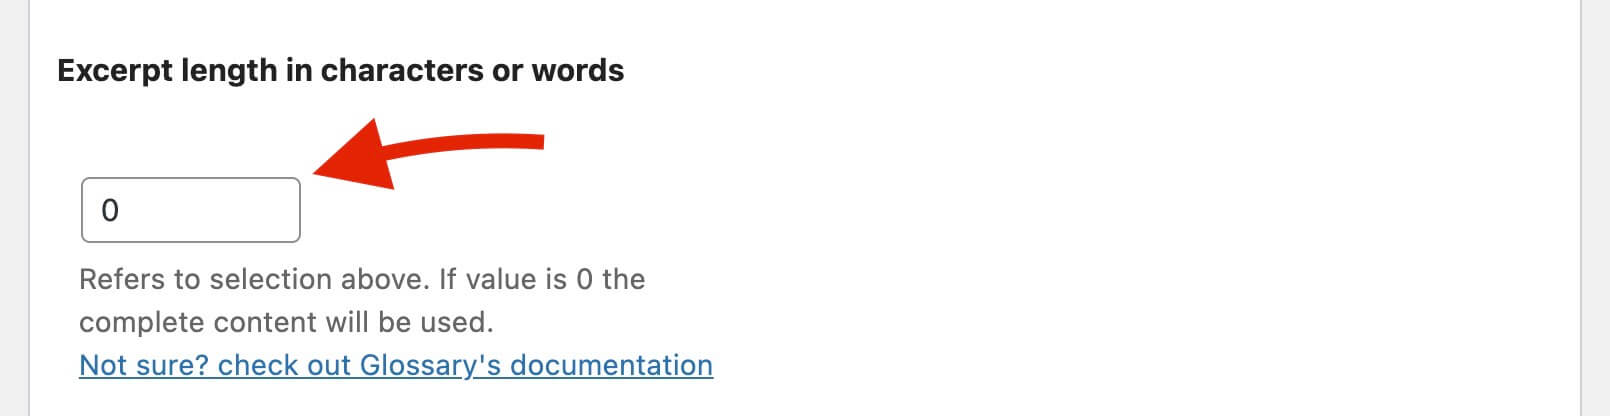
By default, the value will be 60.
As you will go through the settings page, you will find more customization options that you can tweak as per your requirements.
Once you have done the setup, click Save (available at the bottom of the page) to save the settings you have applied.
The Glossary plugin will now search for the same term on your site that you have added and will show the popup with information about the term when you will hover the mouse over it.

In this plugin also, you get an option to add the matching term below the editor when you will add a new term by going to Glossary » Add New or by editing the existing one.
For example, the matching term for Car could be Cars and Automobile, so you don’t need to add these separately in two new entries.
You can add them all in the same entry.
If you have more than one word to add then separate them with a comma (,).

Whenever the Glossary plugin sees the matching terms on your site, it will automatically show the same popup with information.
The great part about this plugin is it provides many customization options to choose from. For examples:
- You can choose if you want to show popups for matching terms on pages, posts, menus, categories, etc.
- You can choose if you want to show an image in the popup card, just like Wikipedia shows.
- The term for which the popup card is displaying, you can choose whether it is an external or internal link and add a link to it. As you will add a link, it will get reflected in all matching terms automatically.
- You can decide whether to open an external link in a new tab or the same tab and add an icon to the external link to differentiate it from the internal link.
- You can disable the plugin for any particular post/page from the editor of the post/page.
What if you already have a link for a term on the site?
Similar to the WordPress.org Glossary plugin, if you have set the description for a term to show a popup on it, and at the same time, if you have a link for the same term on any page, post, or comment.
Then the plugin will automatically remove the popup feature from the term, and the link will be given priority.
That means your link will not get disturbed or captured by the popup function and will work as usual.
Does Glossary work on mobile devices?
The Glossary plugin works for mobile devices and shows a popup there, but as you will click on a term to see the popup, the popup will appear, and at the same time, it will redirect you to the glossary page of the term as well.
If you want the Glossary plugin not to do this and only show the popup with the description when clicking on any term, then I would recommend purchasing the paid plan of the plugin.
4. WordPress Tooltips
This plugin is a good alternative to WordPress.org Glossary and offers appearance customization options.
After activation of the plugin, to add a new term with a description, you can go to Tooltips » Add New in the left sidebar of your WordPress admin dashboard.
In this plugin as well, you get an option to add the matching term on the right side of the post/page editor when you will add a new term by going to Tooltips » Add New or by editing the existing one.

For example, the matching term for Brave could be Courageous and Fearless, so you don’t need to add these separately in two new entries.
You can add them all in the same entry.
If you have more than one word to add, then separate them with a vertical bar (|). For example, Courageous | Fearless.
If you want to change the look of the popup display for a term, you can change the appearance by going to Tooltips » Global Settings.
One thing I found in this plugin is if you increase the font size from the Global Settings, then the line height doesn’t get adjusted according to font size and the text may look compact.
However, this issue can be easily resolved using the below CSS, which you can apply on your site by going to Appearance (available on the left side of the WordPress admin dashboard) » Customize » Additional CSS.
/* Adjust line height in popup for Tooltips plugin */
.qtip-content {
   line-height: 1.618em;
}
If you are using a full site editing theme, then you can open the Additional CSS section on your site by adding wp-admin/customize.php at the end of your site’s URL.
For example, if you have WordPress installed at example.com, then the URL will look like this:
- https://example.com/wp-admin/customize.php
And if you have WordPress installed in a subdirectory like example.com/wp, then the URL will look like this:
- https://example.com/wp/wp-admin/customize.php
What if you already have a link for a term on the site?
Similar to the above plugins, if you have set the description for a term to show a popup on it, and at the same time, if you have a link for the same term on any page or post or comment, then the plugin will continue to show the popup for the term if you hover the mouse over it.
Also, the link for the term will stay active, so if you click on the link, it will redirect you to the relevant page/post for which you have configured the link.
Does WordPress Tooltips work on mobile devices?
I tested the plugin for mobile devices, and it works perfectly there.
However, the hover functionality is not possible on mobile devices, so you will need to click on a term to see the popup having information for the term.
More Similar Plugins
Apart from the plugins I listed above, there are more WordPress plugins available that provide a similar option to achieve popup functionality on your site:
- CM Tooltip Glossary – This plugin is similar to the Glossary plugin I have mentioned above. But one thing I was not able to find is, a way to insert an alternative name for the same term, so you may need to add two entries for similar terms. For example, for car and cars, you will have to add two separate entries.
- Encyclopedia / Glossary / Wiki – This plugin has the same limitation, as here also, you can’t add alternative names for the same term.
- WP Wiki Tooltip – This plugin works similarly to the Wikipedia Preview plugin we explored above but uses shortcodes to show the popup.
Conclusion
If you are looking for a simple plugin to display popups for words or terms, then I would recommend you to either go for WordPress.org Glossary (simple) or WordPress Tooltips (simple with customization options).
If you are looking for more robustness and flexibility in customization, then you can go for the Glossary plugin – this is the best option.
If you want to show a brief description for a term directly from Wikipedia, then you can go for Wikipedia Preview or WP Wiki Tooltip.
WP Wiki Tooltip works similarly to Wikipedia Preview, but I found using Wikipedia Preview is easier than the WP Wiki Tooltip.
Even now, you have an idea about all the plugins. To get the best results, I recommend you test these plugins on your site and check what works best for your site.
Questions for you:
- If you are already using or planning to use any of the above plugins, share with us how it brings value to your site.
- Do you know any other plugins that show a popup for terms like Wikipedia?