Before we get into how to install a WordPress plugin, let’s get a little familiar with the WordPress plugins so that you can understand how it exactly works on a site and why you really need a plugin on your site.
WordPress plugins are a type of software that adds a new feature to your WordPress site and is one of the most popular tools for website owners and creators.
They can be used to extend the functionality of WordPress or to provide additional features that would not otherwise be available in WordPress without changing or modifying the core code of WordPress.
You can understand plugins with the example of apps that you install on your mobile phone or computer to increase their functionality.
Similarly, you can install a plugin to improve the functionality of your site.
There are more than fifty thousand plugins available on the WordPress plugin directory to choose from.
Most of them are completely free, and some of them are free with a paid limitation which means if you pay for those plugins to the plugin creator, then you can unlock more features; otherwise, you can always enjoy the free features of that plugin.
You can install, activate, deactivate, delete, or update a plugin only when your role on the WordPress website is of an Administrator or Super Admin (available in WordPress multisite setup).
However, you will not be able to install, activate, deactivate, delete, or update a plugin if your site is a part of a multisite setup and you are an Administrator on the site, as you need Super Admin access to do that.
To learn more about the roles and capabilities of a user in WordPress, check the Roles and Capabilities article by WordPress.org.
Some more terms I want you to get familiar with are – Install, Activate, Deactivate, and Uninstall.
You are going to see these terms frequently when you will search for any information that is related to WordPress plugins on the internet.
So what do these terms actually mean?
- Install: It means you install the plugin file from the WordPress plugin directory, or you download and upload the plugin file manually to your site and make the plugin ready to get activated on your site. Once you install the plugin, it starts to appear in the Plugins section of your site’s WordPress admin dashboard.
- Activate: It means to start using the plugin features on the site; you activate the plugin after installation. If you have only installed the plugin or only uploaded the plugin from your computer, then the plugin will appear in the Plugins section of your site’s WordPress admin dashboard, but this doesn’t mean the plugin is active on your site. So, in order to activate the plugin and make it work, you will need to activate it.
- Deactivate: Let’s say you have an active plugin working on your site, but for some reason, you want to deactivate it so that whatever the feature plugin provides, it should be completely disabled on your site, but you don’t want to remove the plugin from the Plugins section of your site’s WordPress Admin dashboard. So in order to temporarily disable a plugin, you can deactivate it, and in this case, you can use Deactivate term.
- Uninstall: Now you have deactivated the plugin, and you also want to remove the plugin from the site completely, so in this case, you can use the Uninstall term.
The whole flow from installation to uninstallation of the plugin works like this:
- Install the plugin on the site » Activate to make it work on the site » Deactivate to disable the plugin on the site » Uninstall to remove the plugin from the site completely.
Sometimes with the Install term, most people also mean both install and activate the plugin, and with the Uninstall term, they mean both deactivate and uninstall the plugin.
Now let’s come to our main topic on the methods of installing a WordPress plugin. In this post, we are going to explore four methods of installing a WordPress plugin.
Contents
1. Install a Plugin by Searching in the WordPress Plugin Directory
This method is one of the easiest methods of installing a WordPress plugin, and most of the time, you are going to use this method.
Basic requirements for this method:
- WordPress should be installed properly and working on the site address, and the WordPress admin area of the site should be accessible.
- You have either Super Admin or Administrator role as a user on the site.
- The plugin should be in the WordPress plugin directory.
As a first step, you will need to go to your site’s WordPress admin area. If you’re not logged in, log in to your site’s WordPress admin area using your username or email address and password.
In the next step, navigate to the Plugins » Add New option.
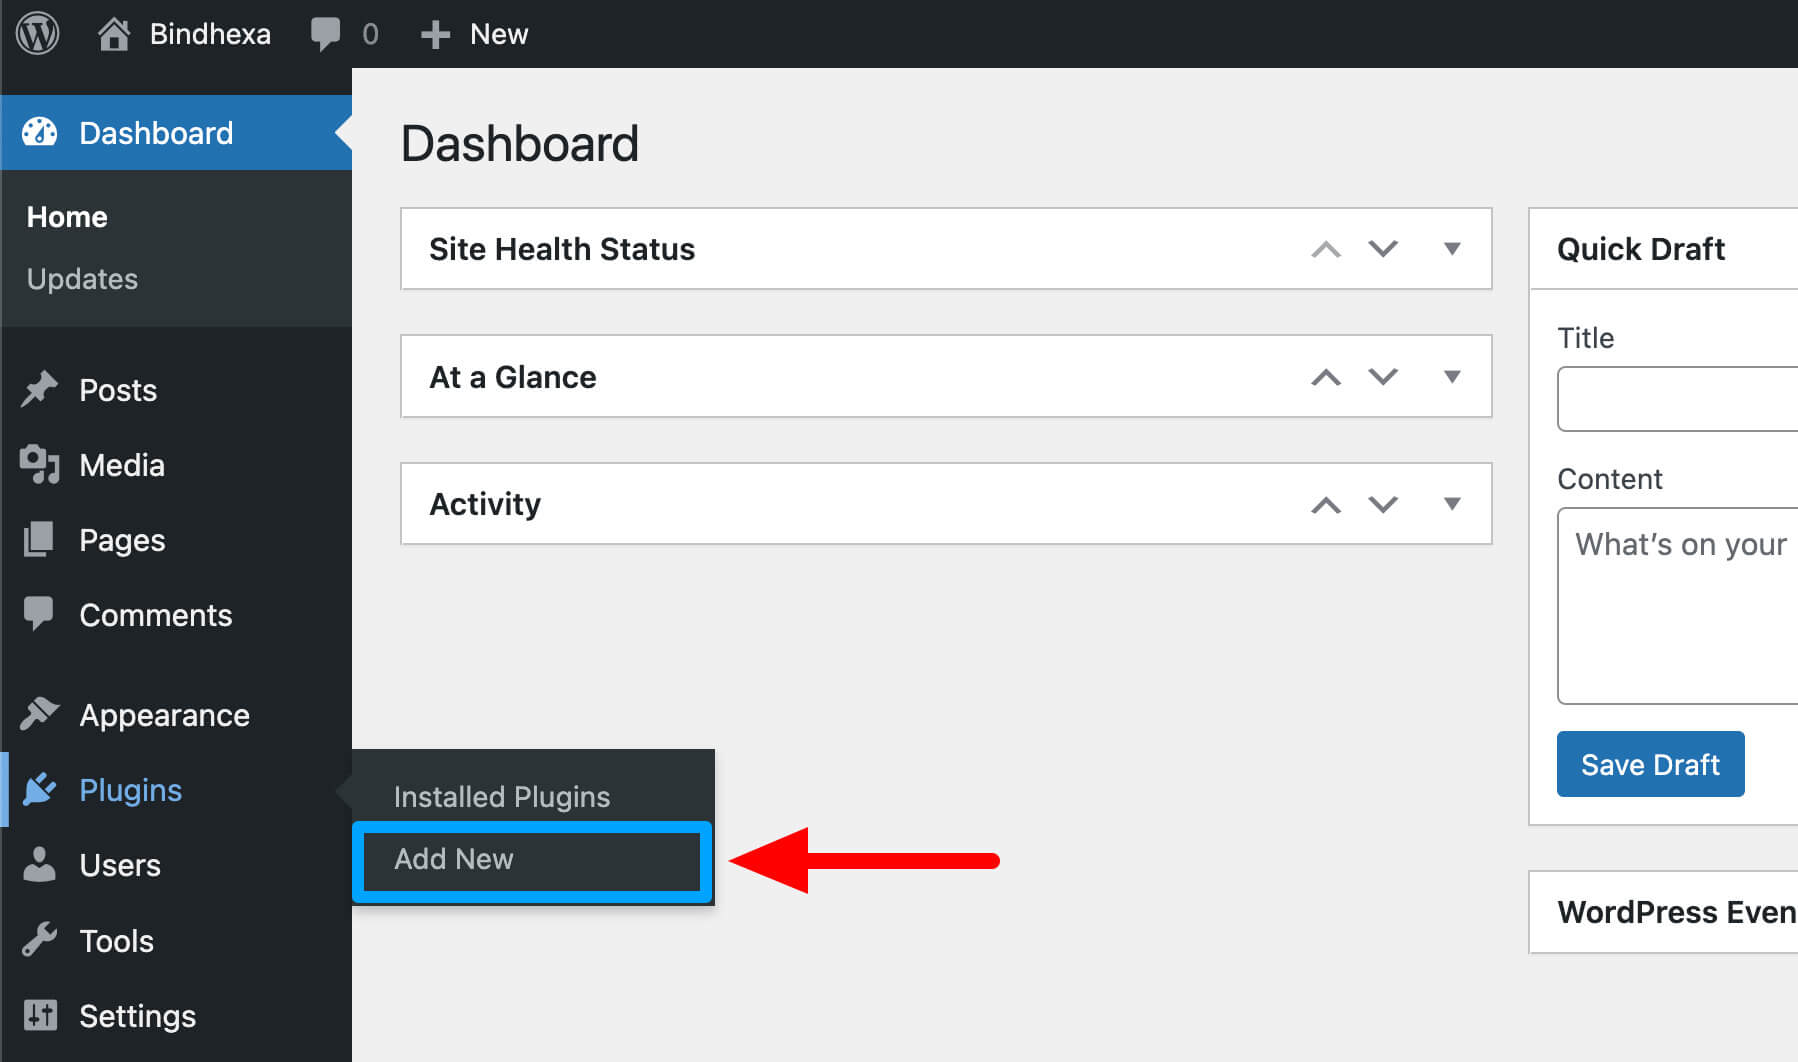
After that, a new page will open from where you can install the plugin that you want in order to increase the functionality of your site.
Here you can also filter plugins list by Featured, Popular, Recommended, and Favorites, or you can search plugins by Keyword, Author, or Tag.
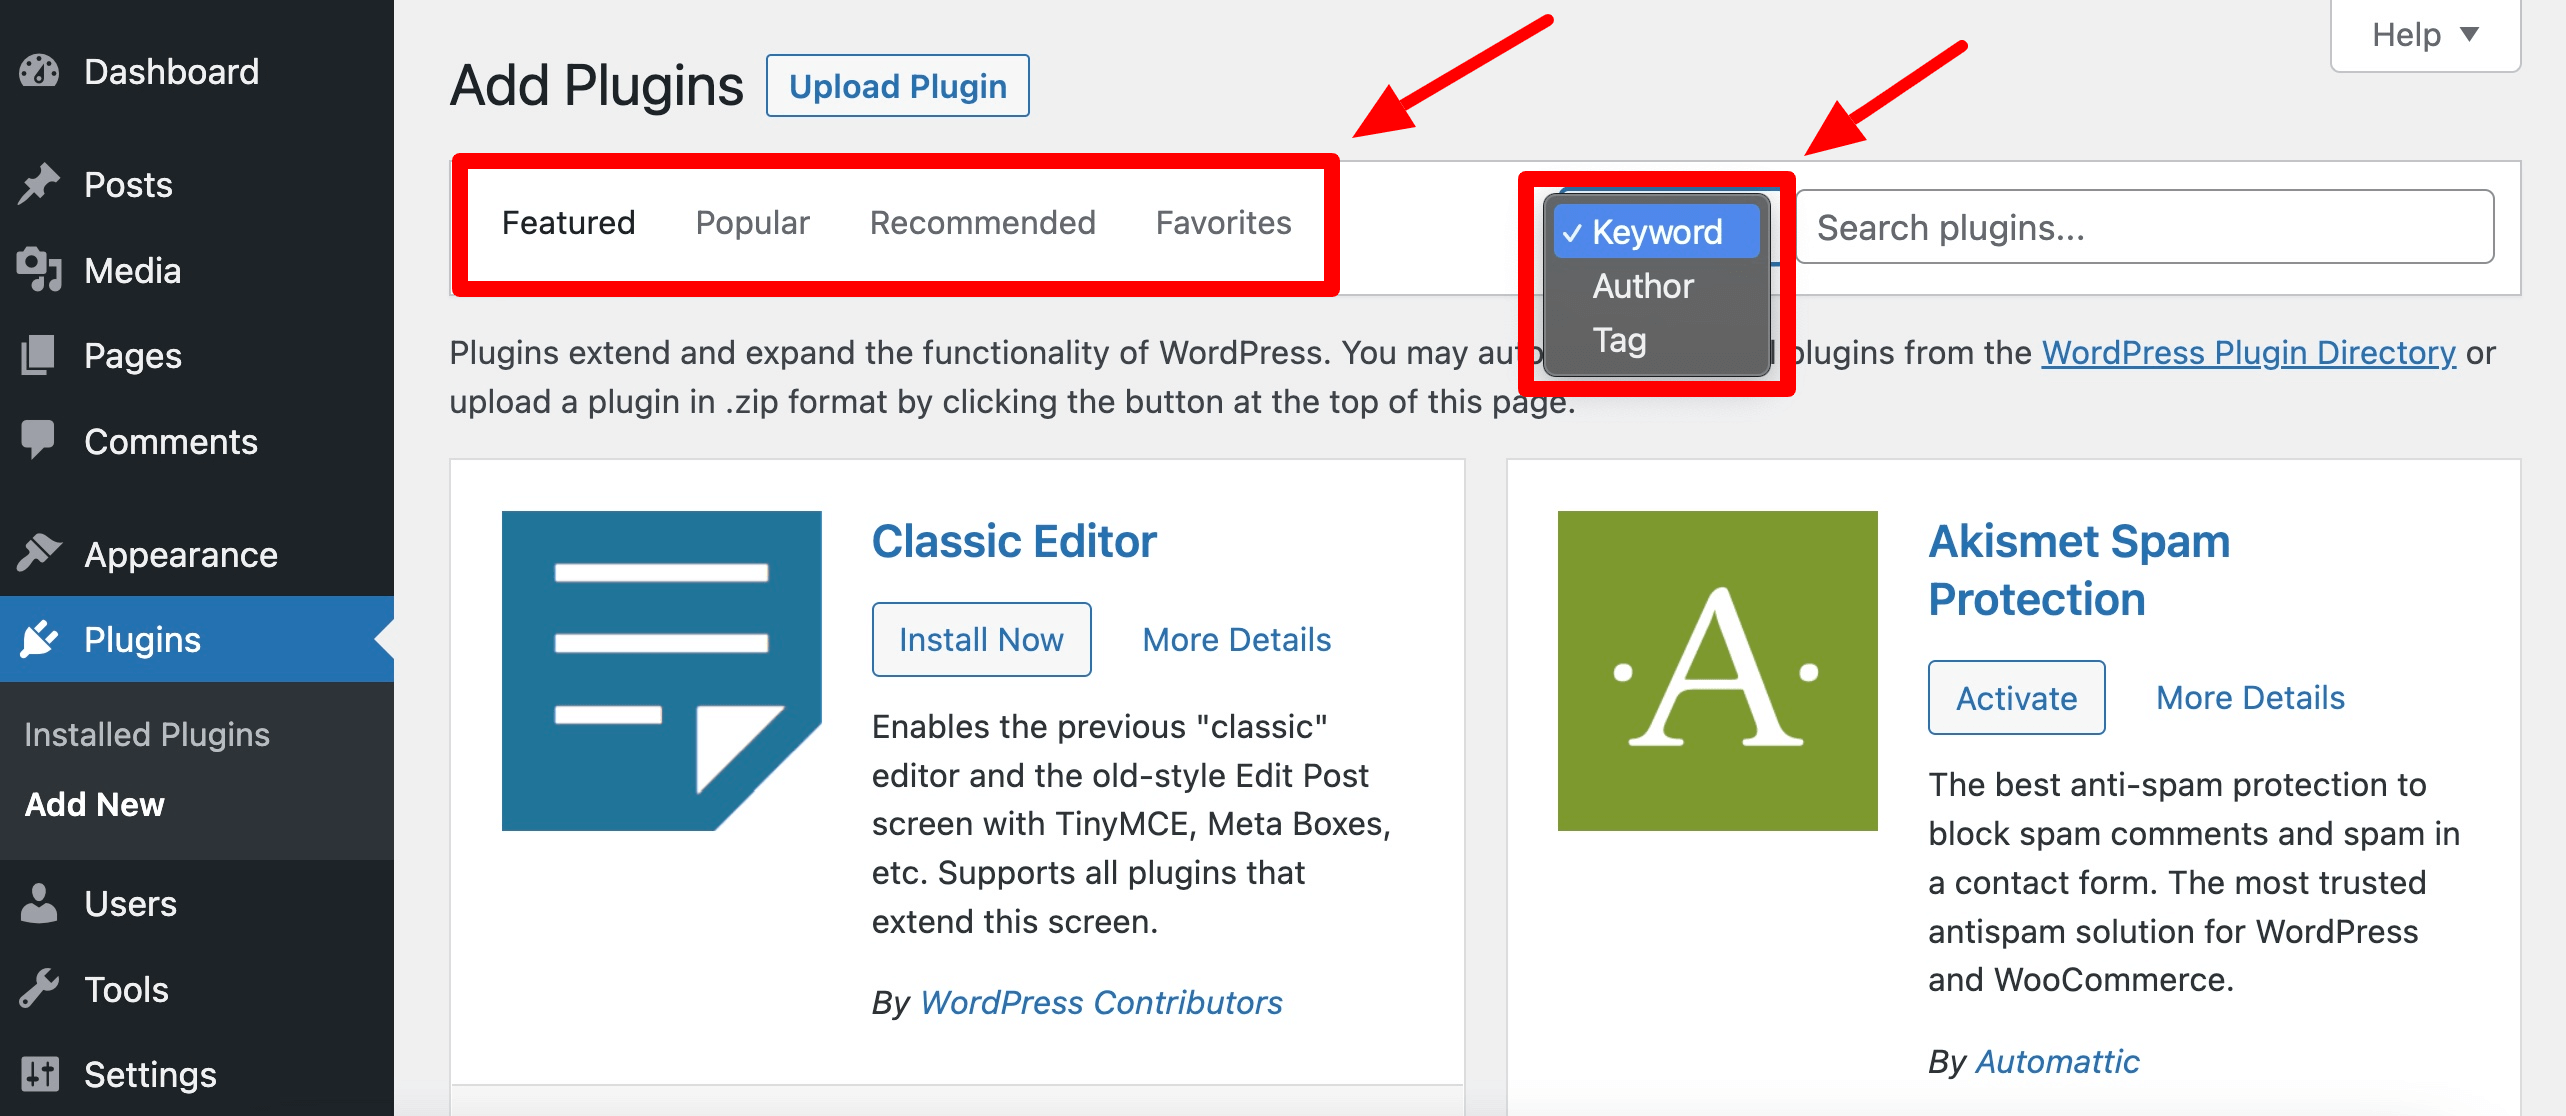
By default, when you search for a plugin, you search by Keyword.
One more thing, I want to let you know that whatever plugin you see in the Plugins » Add New option of the WordPress admin area can also be found on the Plugins page of the WordPress.org site.
So if you want to install a plugin available on the WordPress directory, I recommend using this method.
Otherwise, you will have to download the plugin from the WordPress.org site and then install it by uploading it to the site (I have discussed this process in our next method of installing a plugin).
Let’s say you want to improve SEO on your site and want a plugin for the same, so you can search plugins for the “seo” term.
Similarly, if you want to improve security or want to add a contact form on the site, then you can search for “security” or “contact form” terms, respectively, and so on.
For this tutorial, let’s search for the “seo” term, and as you will do that, you will find many plugins in the search result.
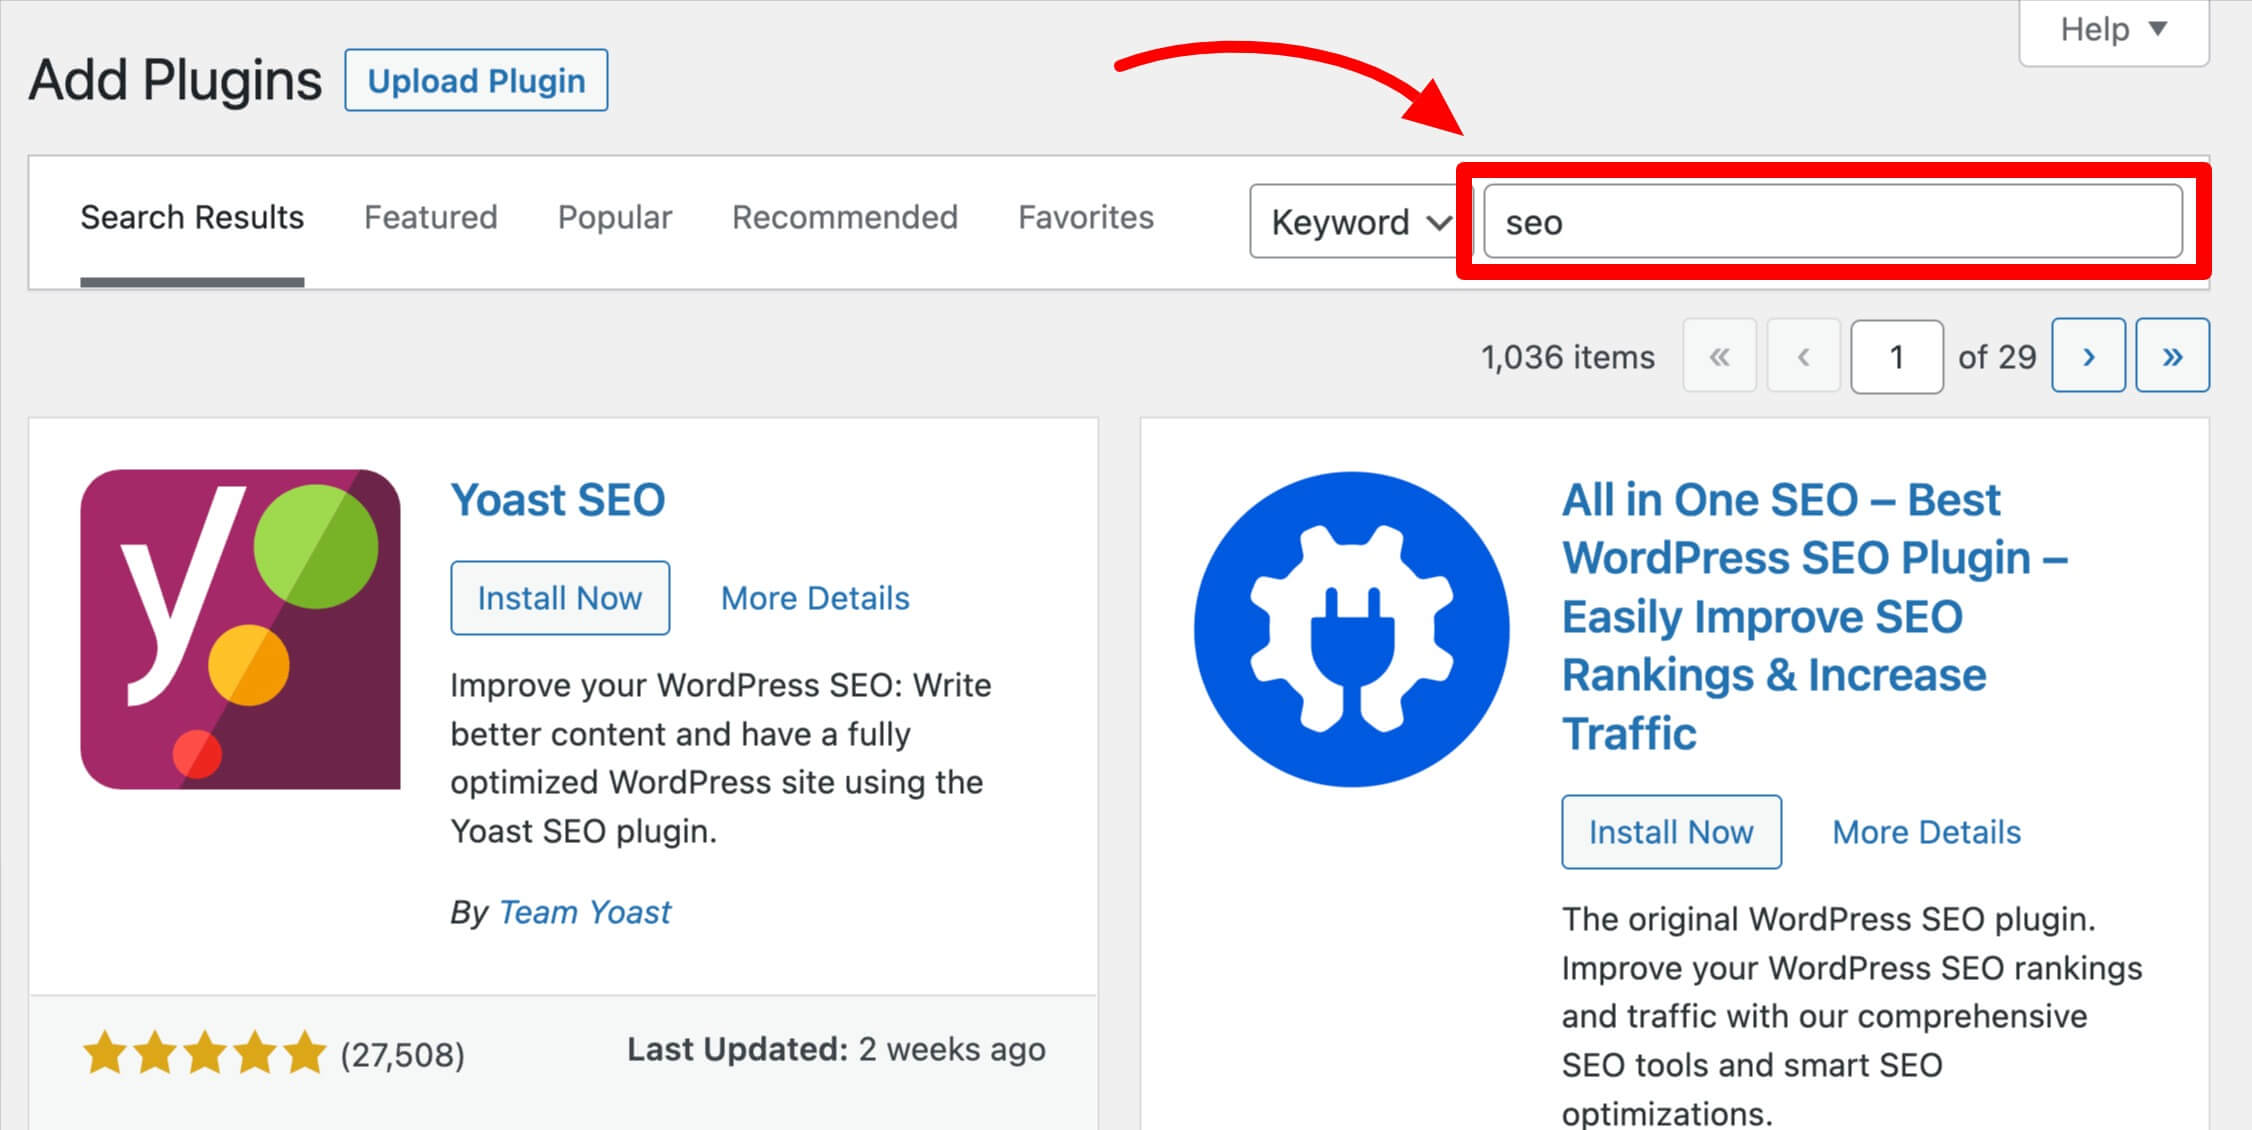
If you are confused, you can do a quick search on the internet to see which plugin could be best for your site.
If the plugin is in the WordPress plugin directory, then WordPress also shows some basic information about the plugin, which can give you an idea about the plugin.
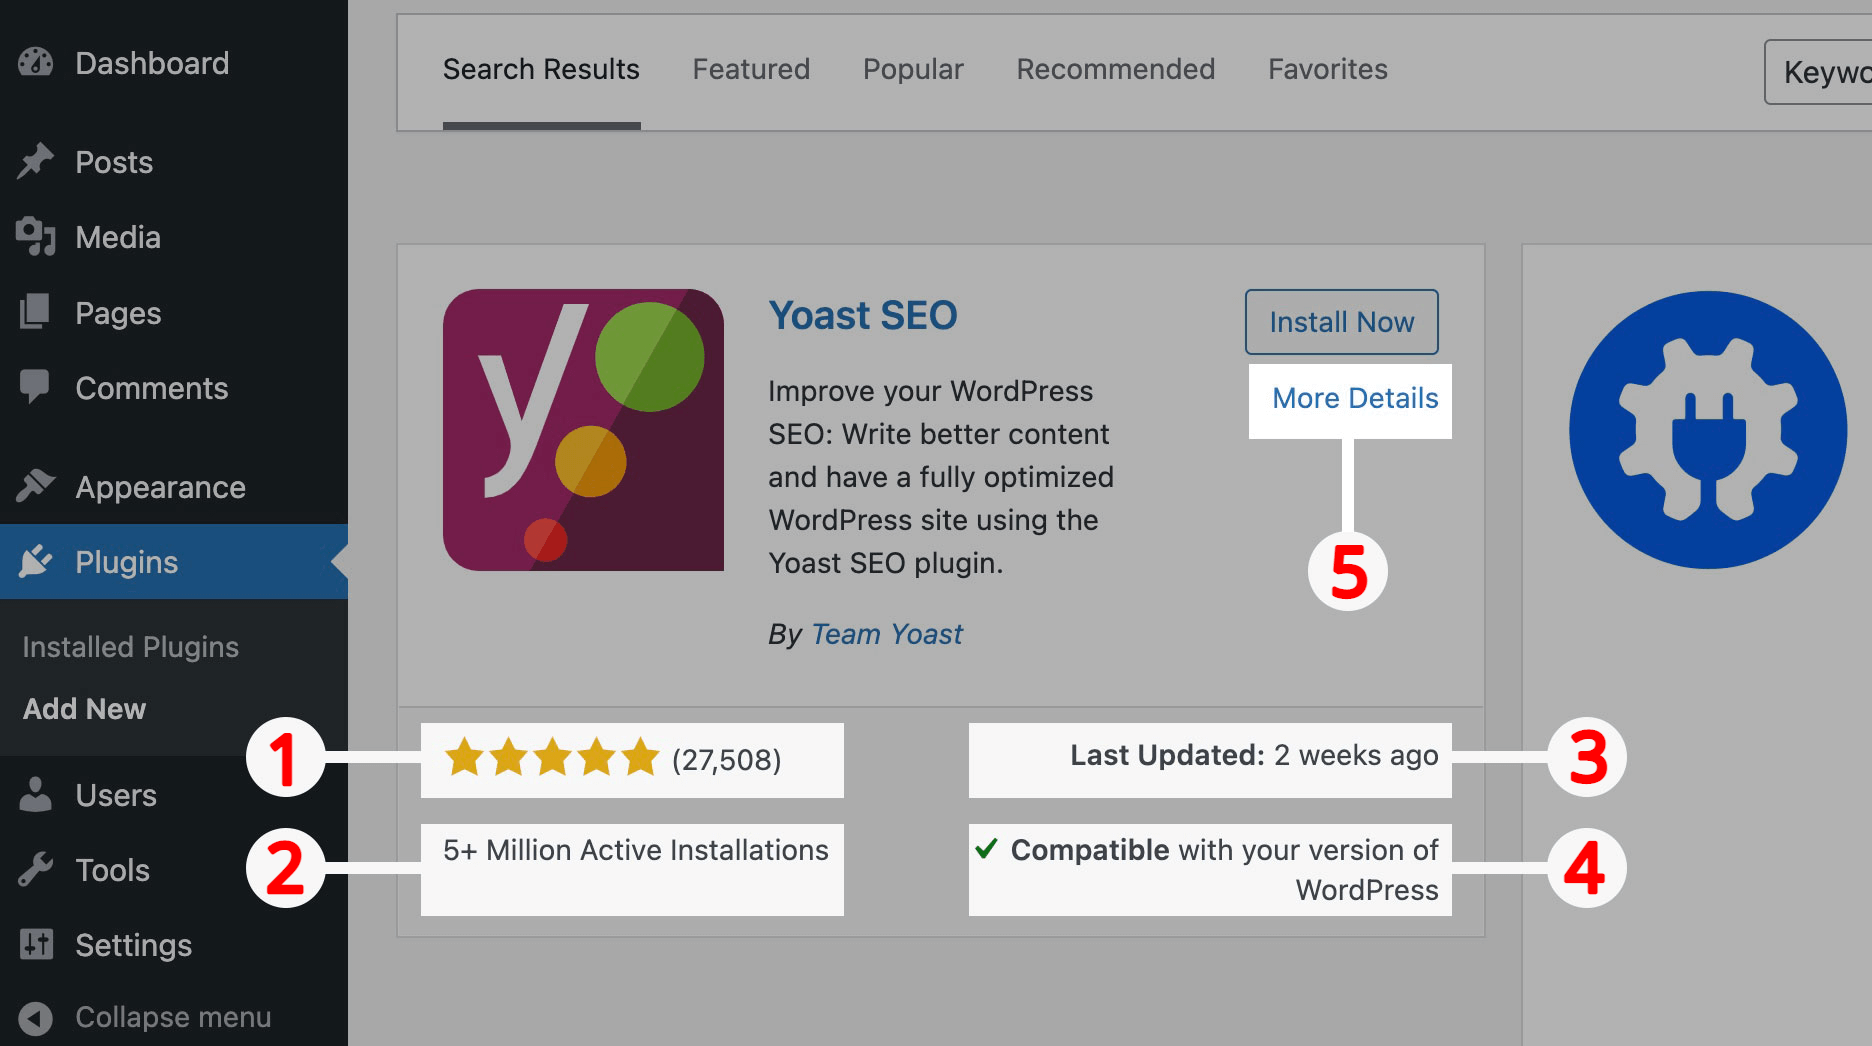
- Rating: Displays stars count from the users who have rated and written a review for the plugin, five stars indicate the highest rating, and one indicates the lowest.
- Active Installations: Indicates the popularity of a plugin by showing the number of websites on which the plugin is installed.
- Last Updated: Indicates the date of the last change made to a plugin by their providers.
- Compatible: Indicates if the plugin is compatible/tested with your version of WordPress, and you can read more in full detail here on what to do if WordPress shows incompatibility/untested message for any plugin.
- More Details: Shows in-depth information about a plugin, like the detailed description, screenshots, changelog, and reviews written by other users.
In the above metrics, if the Rating and Active Installations of a plugin are low, then that doesn’t always mean the plugin is not good.
And there could be a high chance that the plugin will work perfectly for your site, but it didn’t work for other users. So it is always best to install and test a plugin on your site before reaching a final conclusion. 🙂
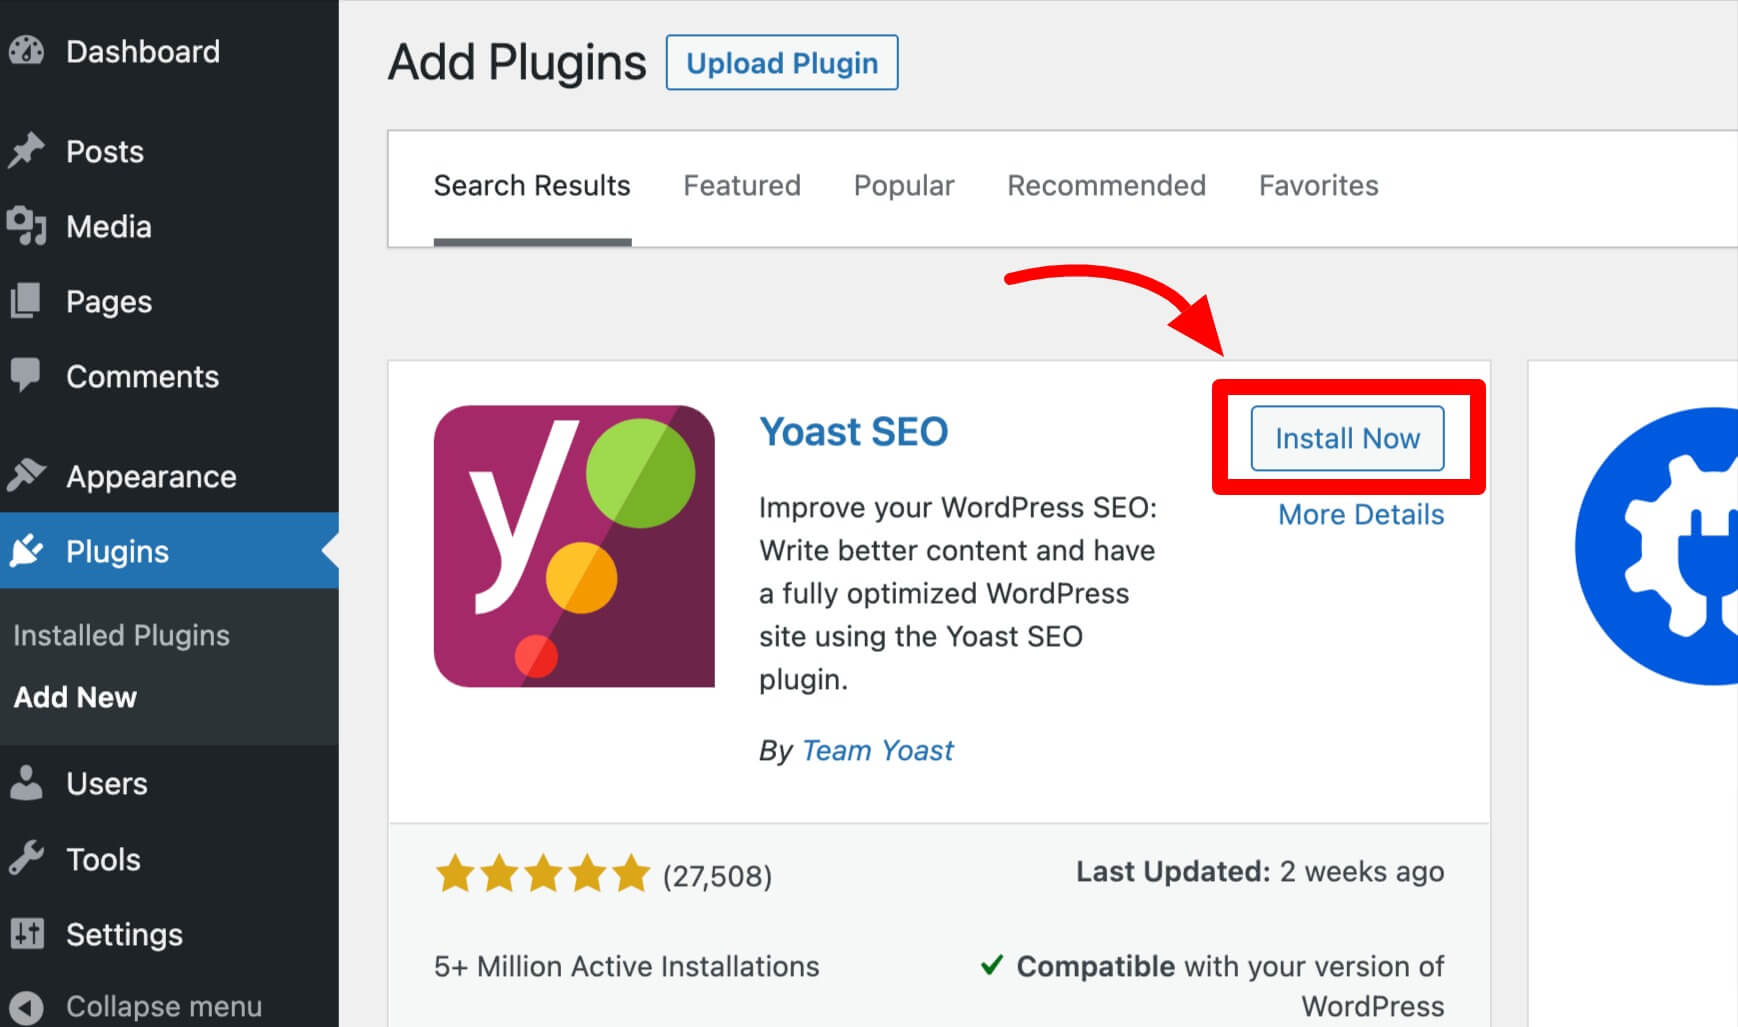
In the next step, you need to click on the Install Now button to install the plugin you want. On clicking the Install Now button, the plugin will start downloading/installing on your site.
After installation, the Install Now button will turn into Activate button like this:
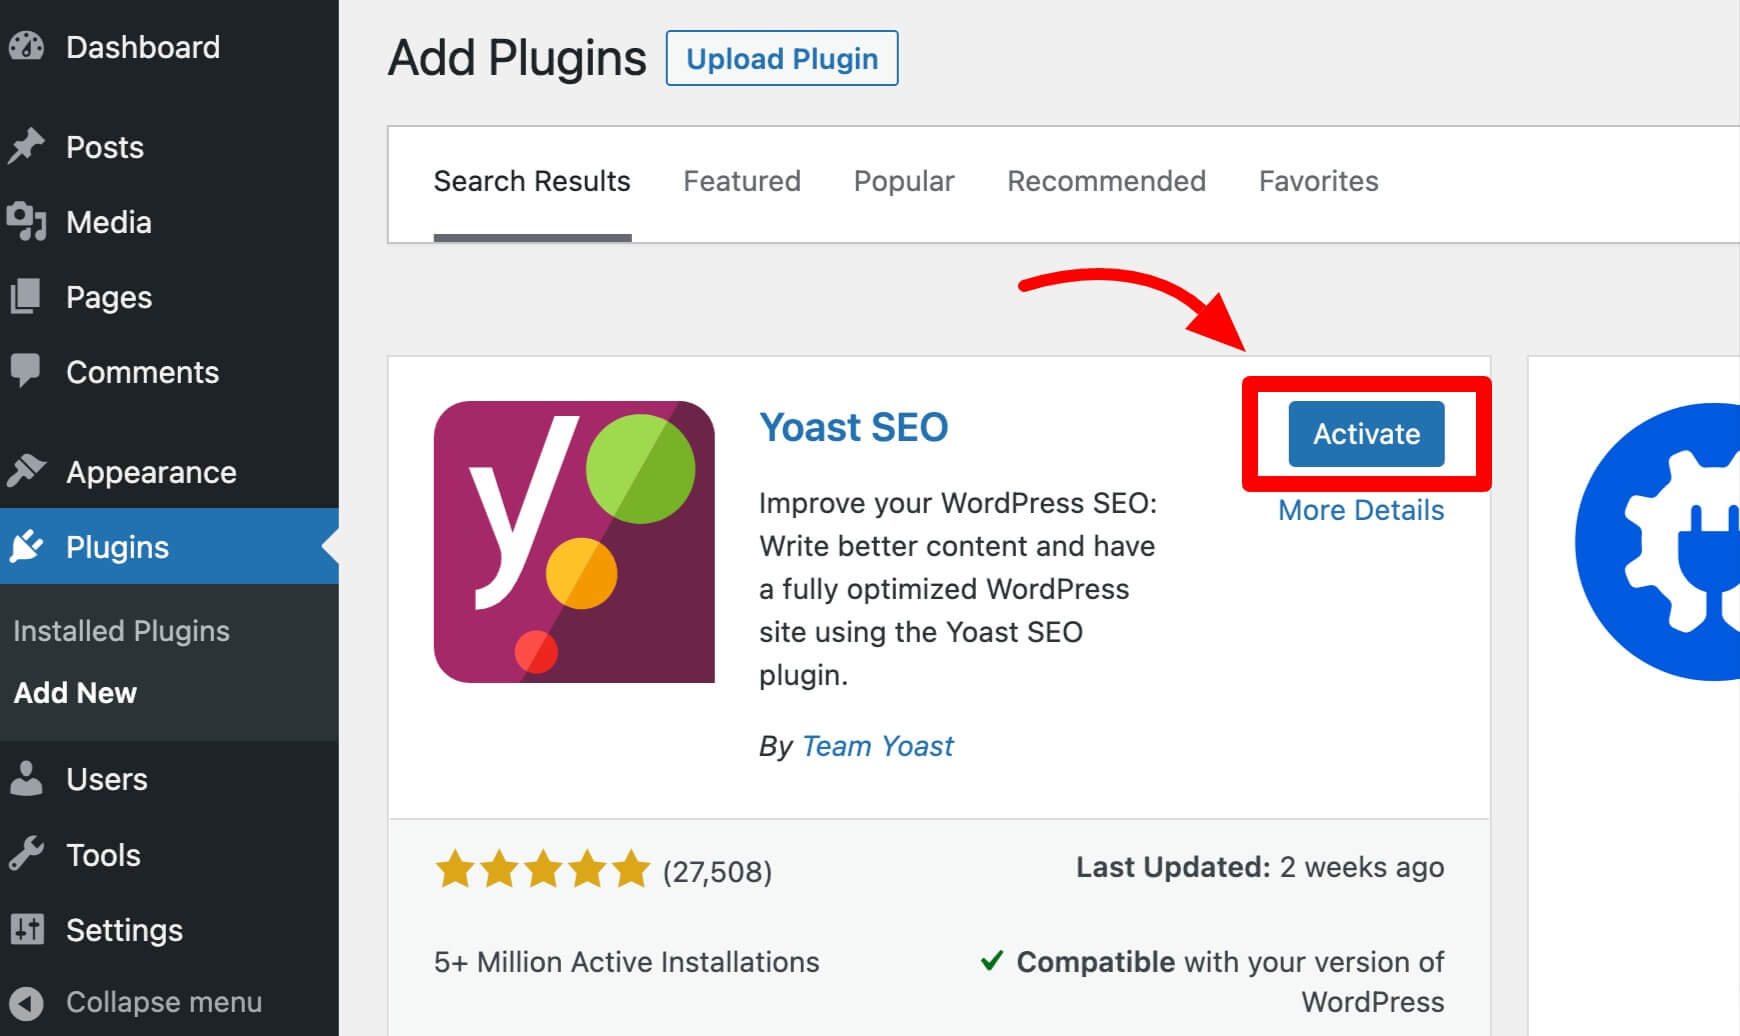
Now you can activate the plugin by clicking on the Activate button to configure and make the plugin work for your site.
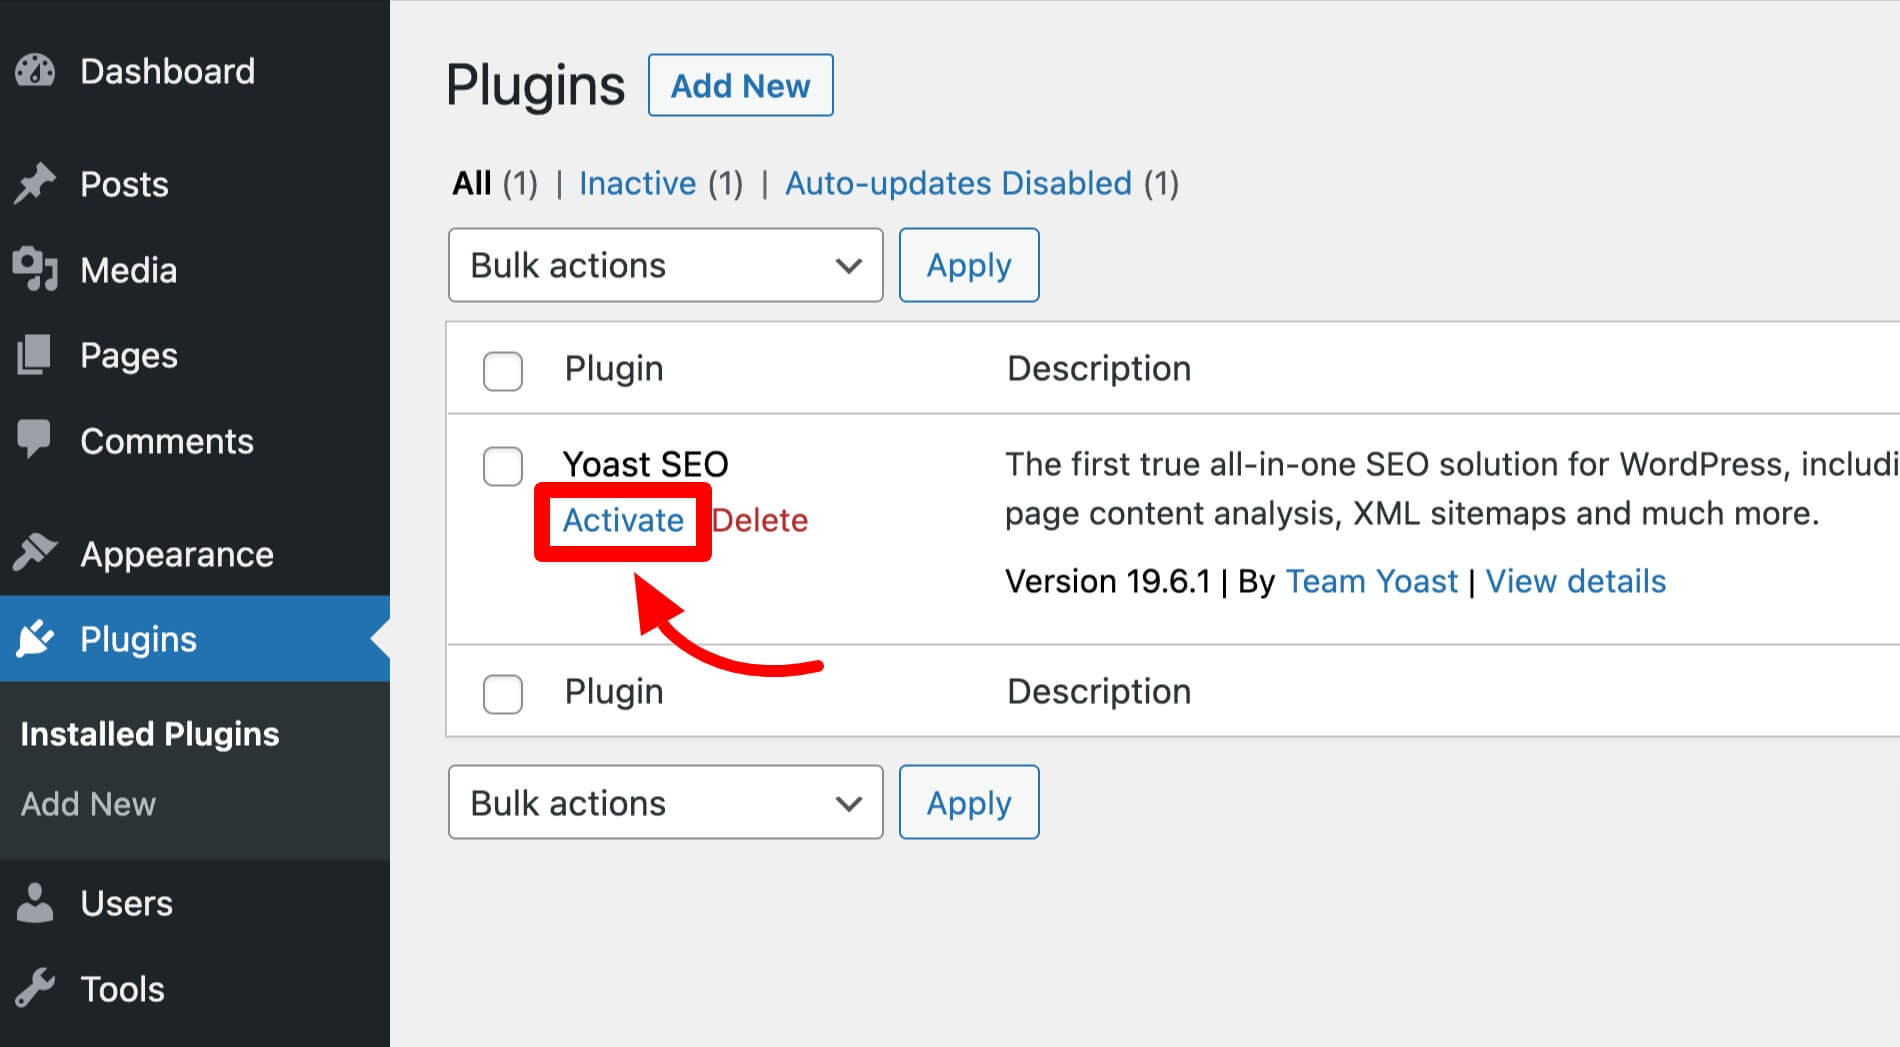
Alternatively, if you don’t want to activate the plugin just after installation, you can also activate it later by going to the Plugins » Installed Plugins option in your site’s WordPress admin area.
2. Install a Plugin by Uploading it from the WordPress Admin Area
If the plugin is available in the WordPress plugin directory, then you can use the above first method to install a plugin.
But what will you do if it is not available in the directory or if you have a plugin file on your computer and wants to install it on your site?
For those cases, you can install a plugin by uploading it from your site’s WordPress admin area.
Basic requirements for this method:
- WordPress should be installed properly and working on the site address, and the WordPress admin area of the site should be accessible.
- You have either Super Admin or Administrator role as a user on the site.
- The plugin you want to install by uploading method should be in .zip file format. In general, plugin providers will always provide you with the file of the plugin in .zip format, but if the .zip format of the file is not available, you can contact the plugin provider, or you can convert the plugin file into a .zip format file before uploading it.
In order to upload the plugin file, first, you need to go to your site’s WordPress admin area. If you’re not logged in, log in with your username or email address and password.
Then navigate to the Plugins » Add New (1) option. After that, a page will open, and you’ll find an Upload Plugin (2) button at the top of that page.
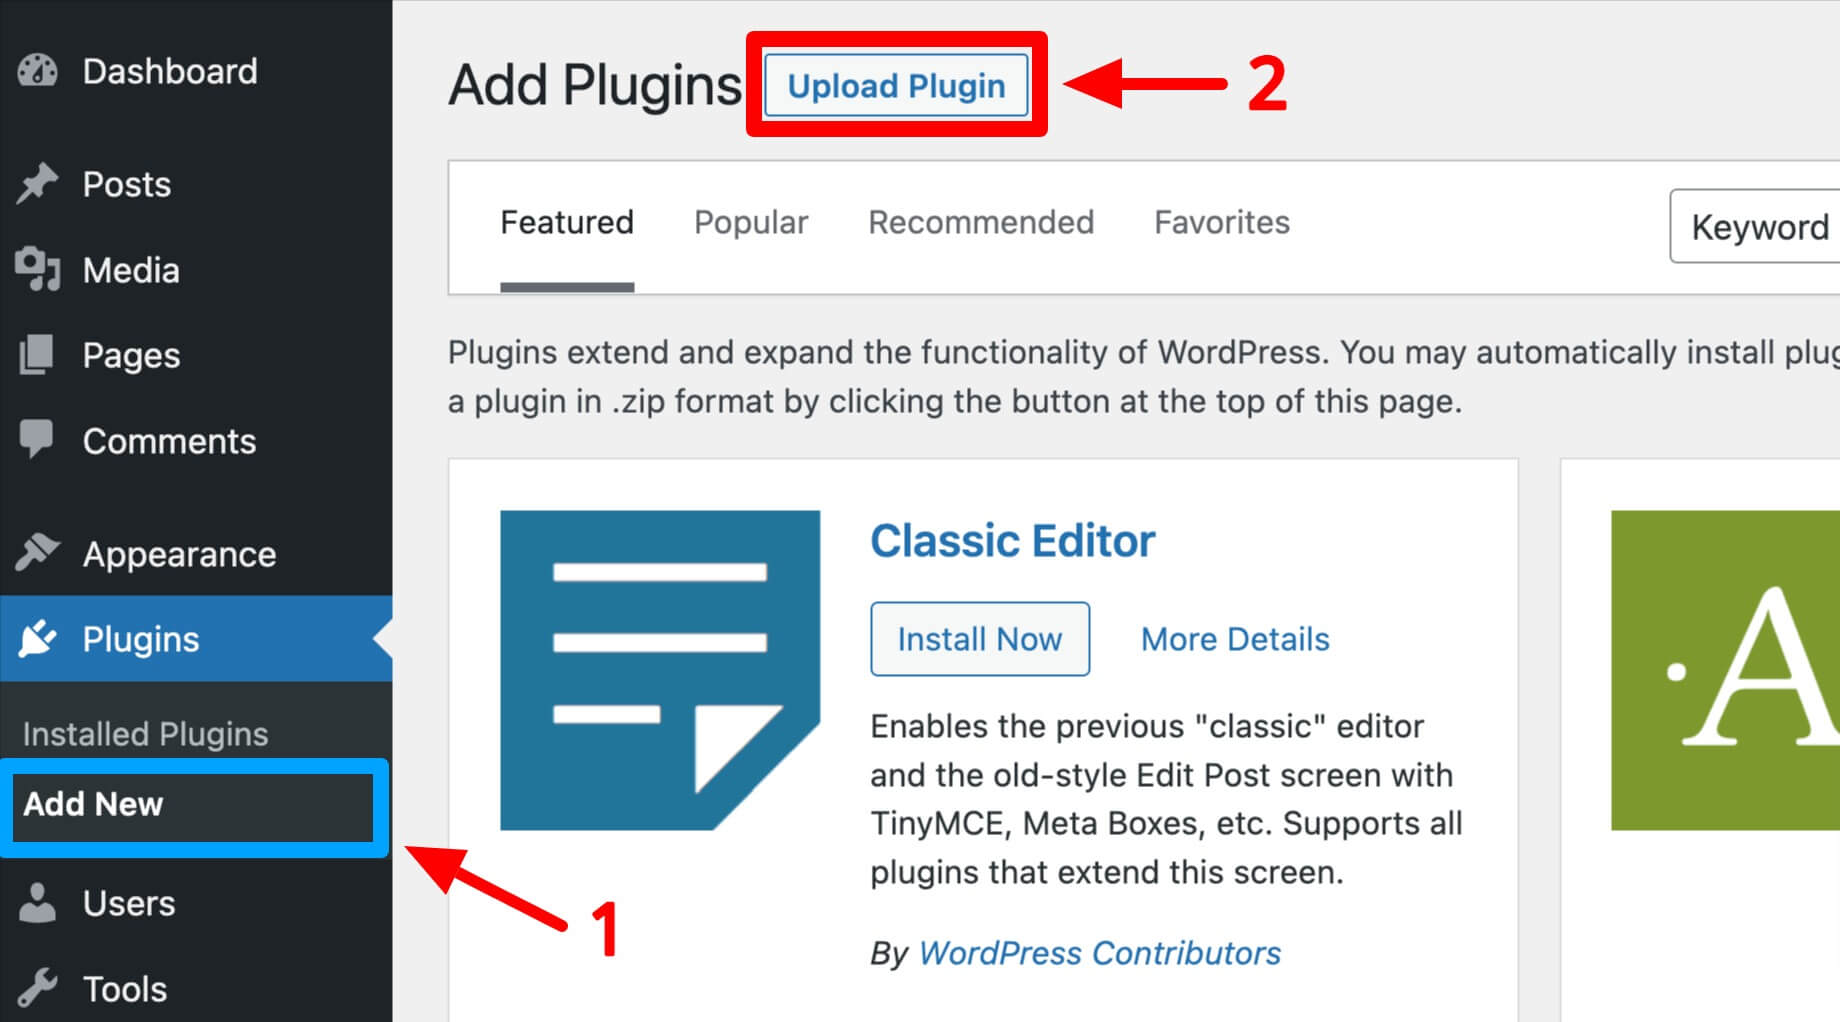
Clicking on it, you’ll be asked to choose the plugin file from your computer.
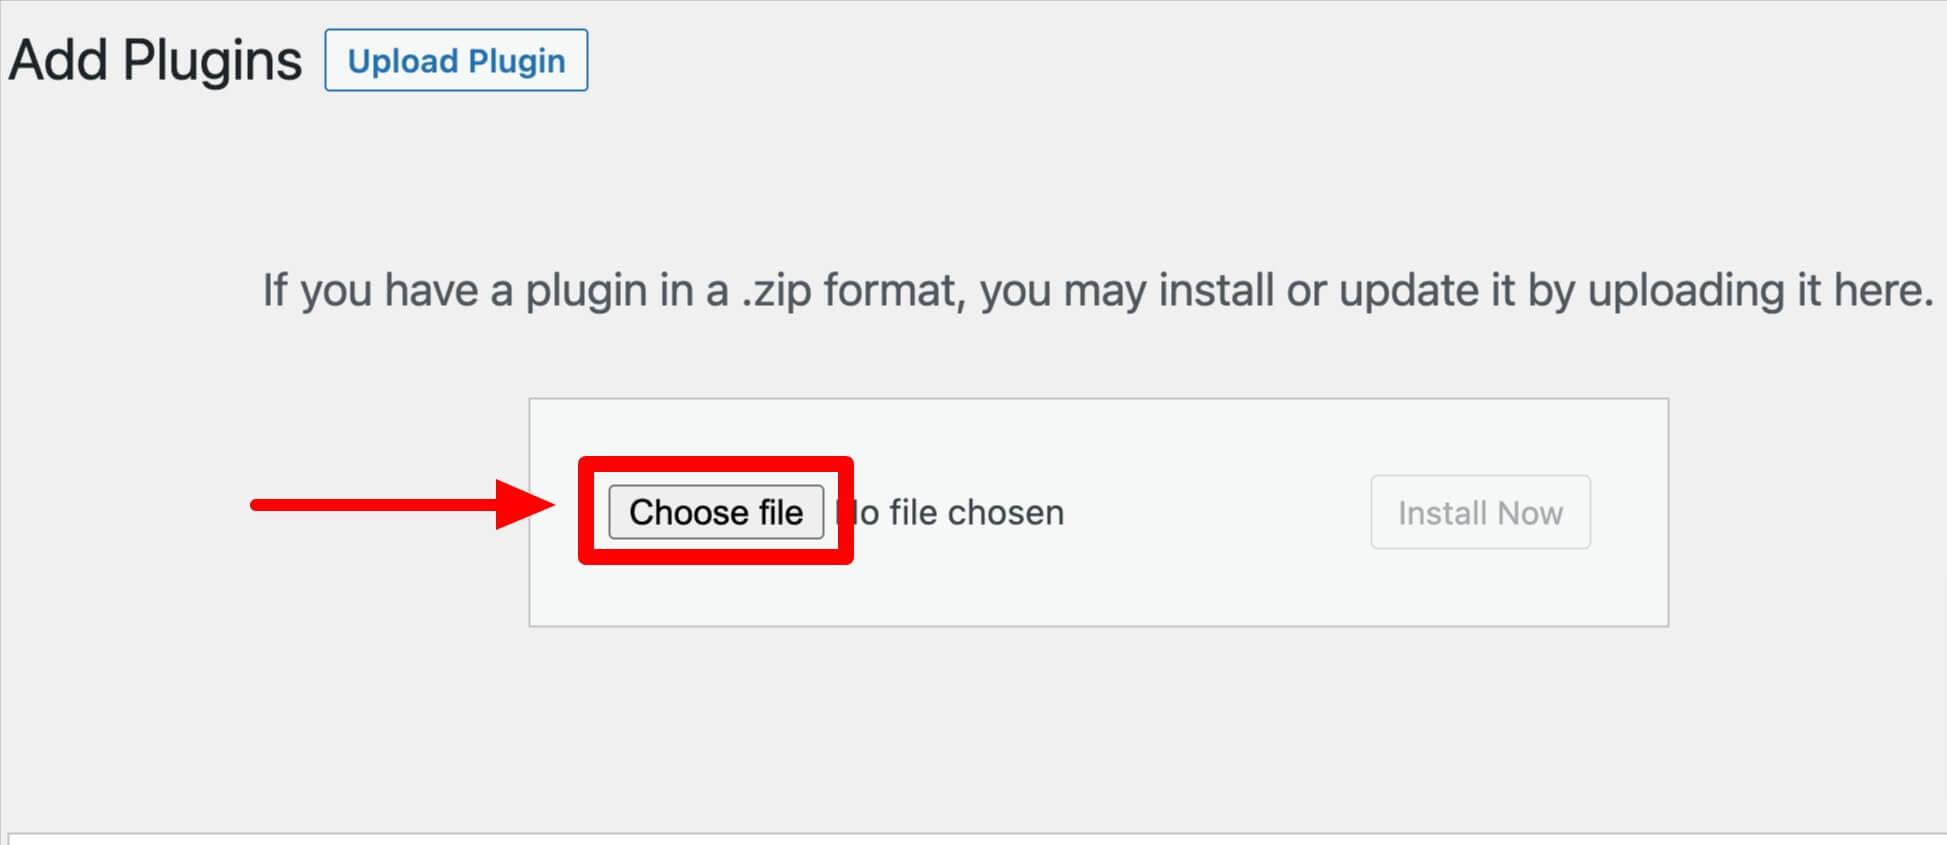
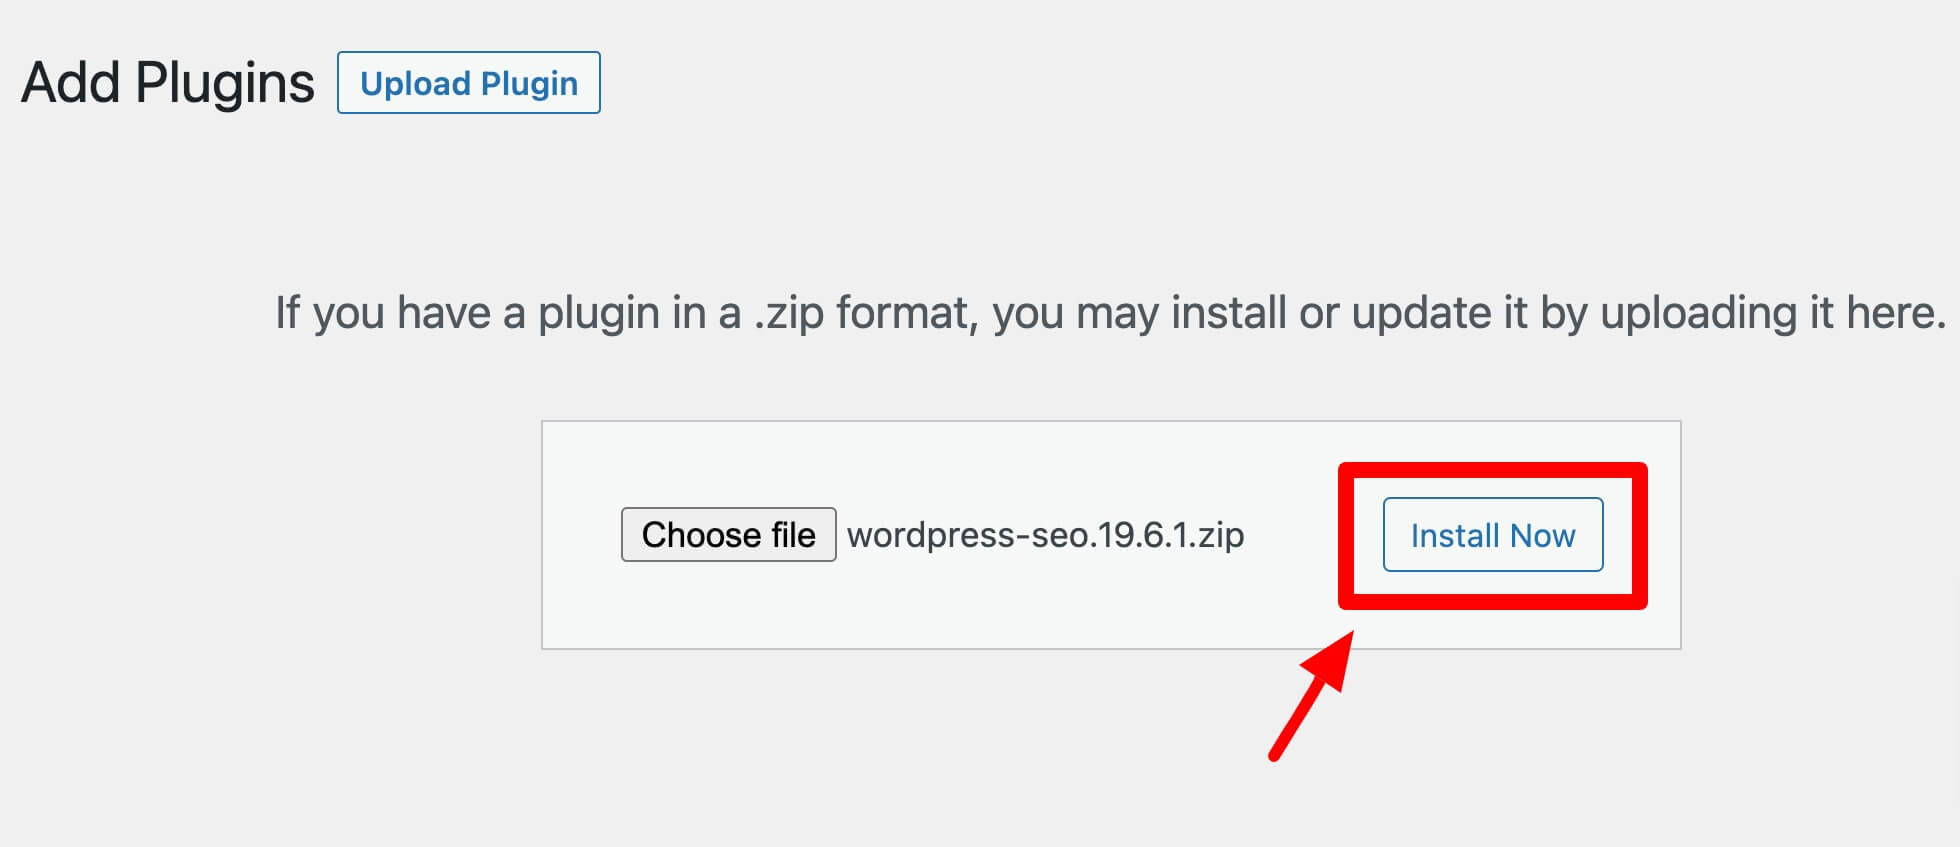
After uploading the plugin file, you will need to click on the Install Now button, available next to your uploaded file.
And the plugin will start to get downloaded/installed on your site.
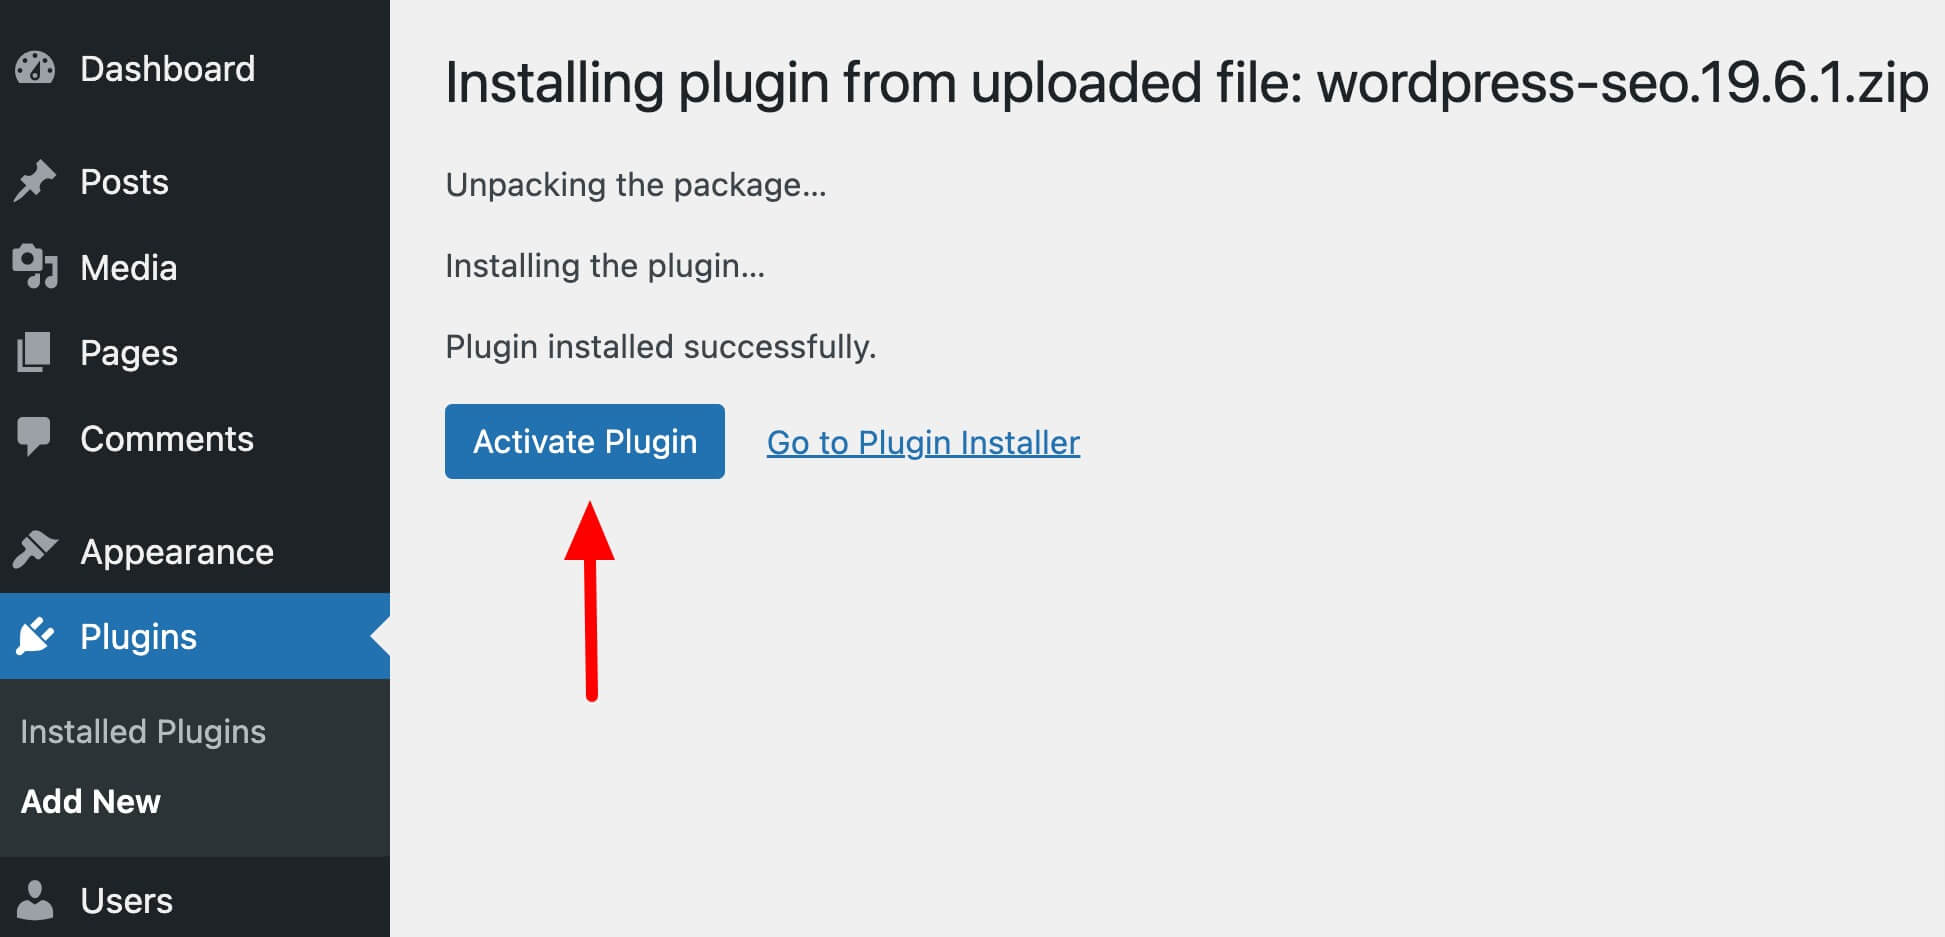
In the next step, after the installation of the plugin, you will be automatically redirected to the activation page to activate the plugin, where you can activate the plugin by clicking on the Activate Plugin button there.
Alternatively, if you don’t want to activate the plugin just after installation, you can also activate it later by going to the Plugins » Installed Plugins option in your site’s WordPress admin area.

3. Install a Plugin by Uploading it from the FTP Client Software
This is another method to install a plugin but not the common one.
You may also find this method a little advance if you are not familiar with FTP client software, but hey, we learn things by exploring them. Right?
So this is the time for you to explore this one. 🙂
Basic requirements for this method:
- WordPress should be properly installed and working on the site address, and the WordPress admin area of the site should be accessible with either Super Admin or Administrator role as a user.
- Unlike our second method, the plugin should not be in the .zip file format. It should be unzipped/uncompressed and in a normal folder, just like you store files in a folder on your computer.
- You should have FTP client software like FileZilla installed on your computer and should have the site’s server login credentials (I have discussed more on this below).
Before installing the plugin using this method, let’s briefly understand FTP and FTP client software.
FTP stands for File Transfer Protocol, which allows you to transfer files over the internet.
There is your computer, and there is also a computer where your site files are stored (also known as the remote server).
So if you want to transfer files from your computer to the remote server directly, the way you can use is FTP, and in order to achieve this, FTP client software makes our work easy.
FTP client software helps to upload/download or transfer files between your computer and the server (where a site is hosted) on an internet connection.
There are many FTP client software available in the market that you can use.
Out of those, FileZilla is one of the popular FTP client software which I use, and you can also download it from the FileZilla site.
Here I have used FileZilla software to show how this method of installing a plugin works, but the process will be similar for other FTP client software as well.
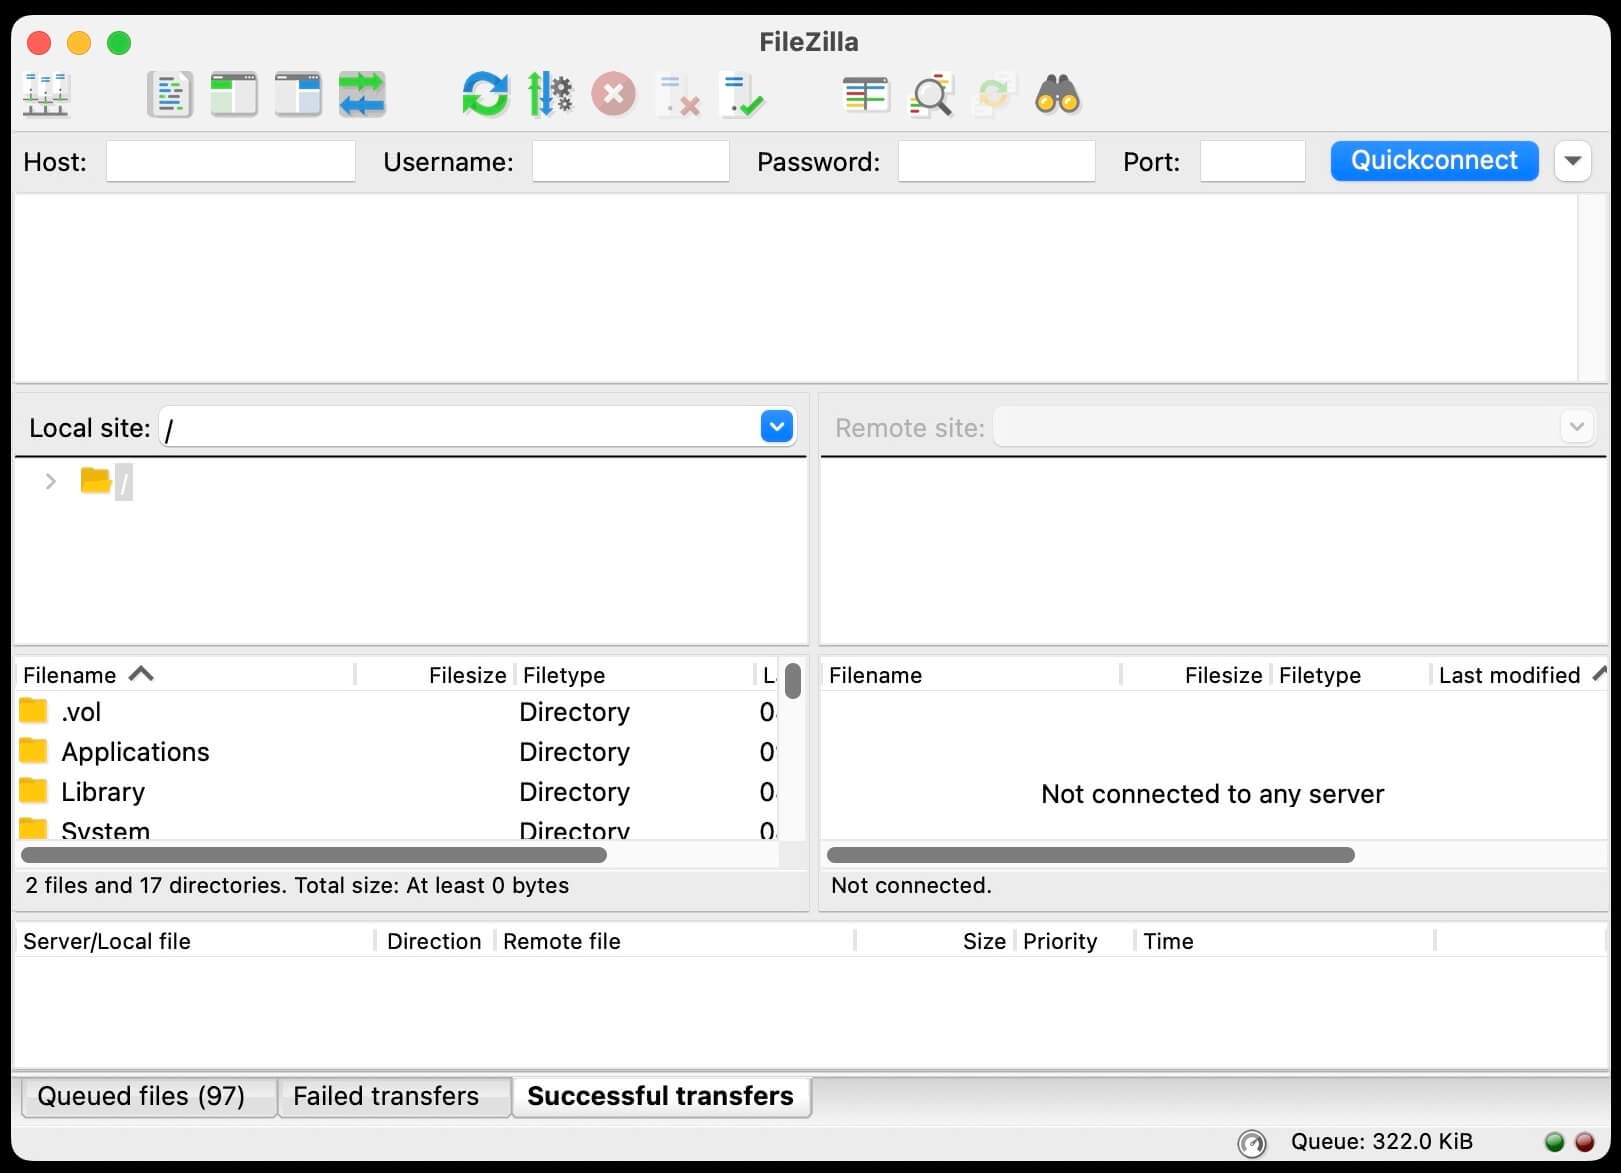
After downloading and installing the FileZilla software correctly on your computer. You can open it, and you will see a dashboard something like this:
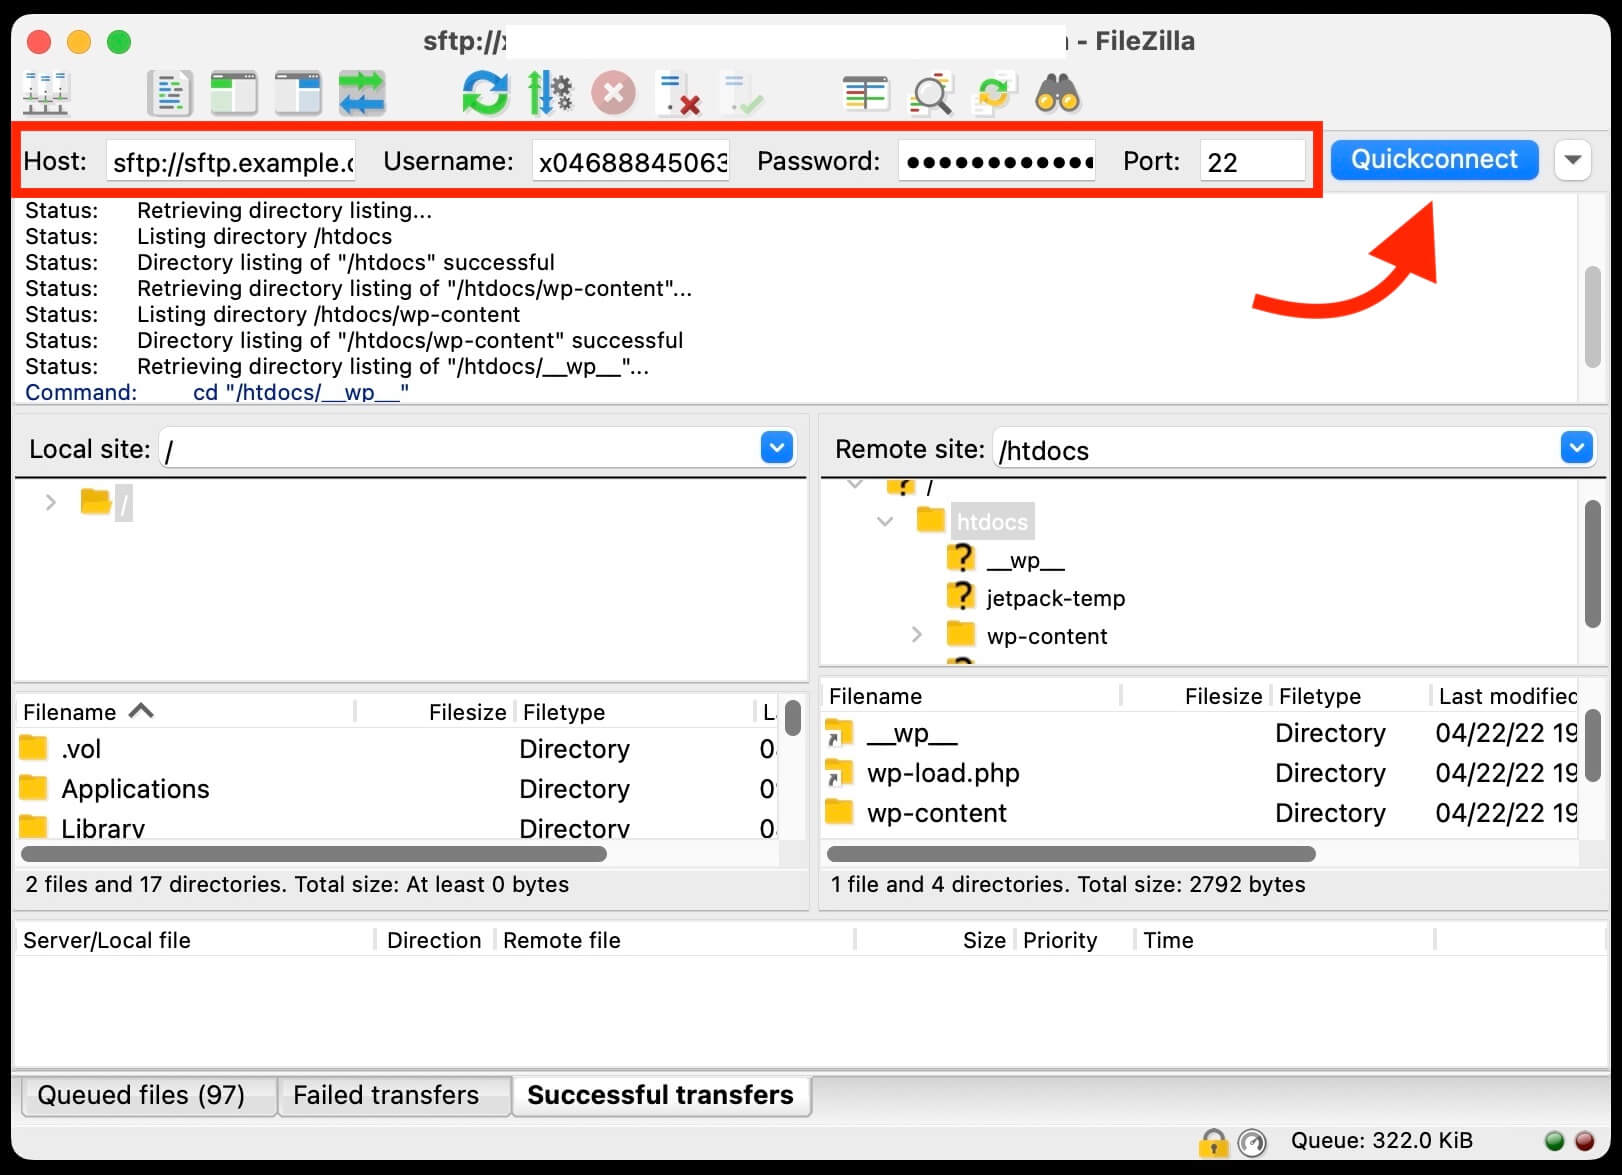
In the next step, you’ll need to enter your site’s server login credentials: Host, Username, Password, and Port.
- Host: It will be your domain name or server IP address. In most cases, you will need to enter the domain name.
- Username: This will be your FTP account username, which you can create in the FTP accounts section of your hosting provider.
- Password: This will be your password for your FTP account that you will create in the FTP accounts section of your hosting provider.
- Port: The port will be 21 for FTP.
If you are having difficulties finding any of the above information, you can always contact your hosting provider or check their support article for further help.
After filling in all the information, you need to click on the Quickconnect button to connect the software to the server.
As you connect, you need to go wp-content » plugins folder in the Remote site section (available on the right side of the FileZilla software).
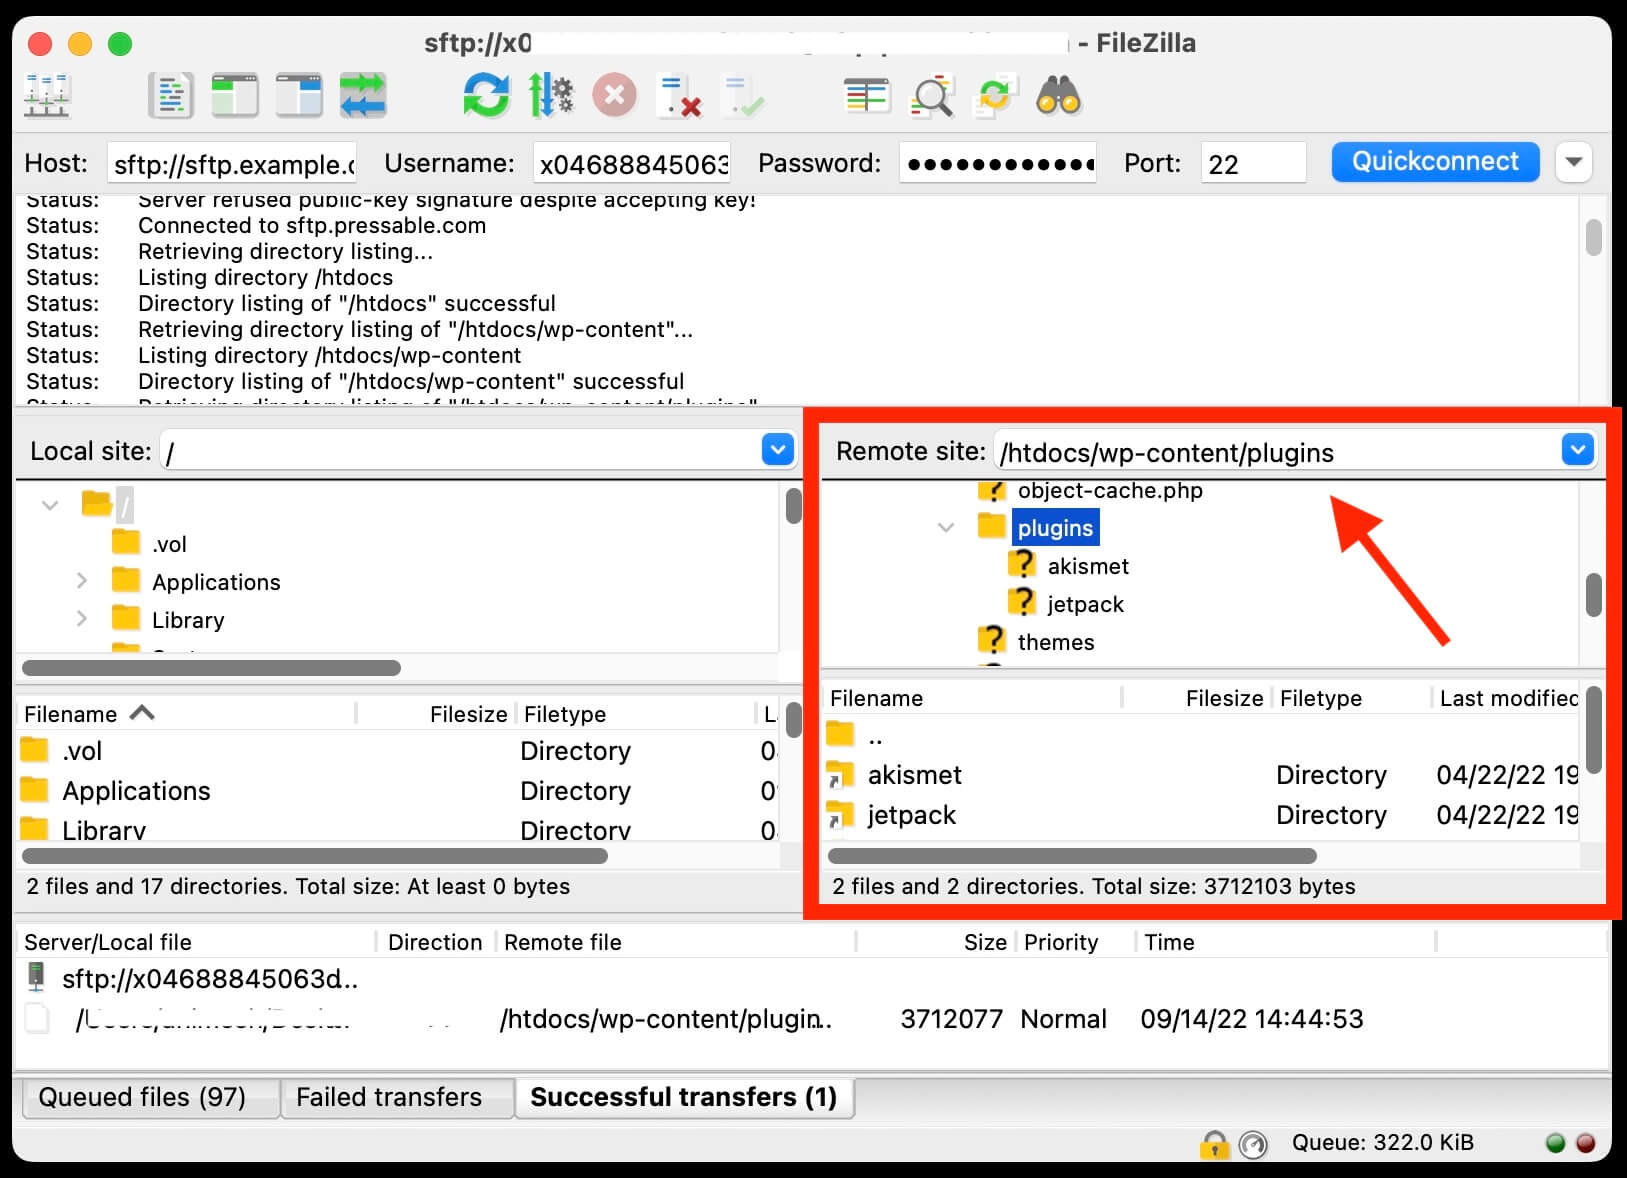
And you will be able to see plugin folders of all your plugins if they are already installed on your website.
If the plugin is downloaded in a .zip file format on your computer, this time, you will need to extract it before uploading it using the FTP client software.
If your downloaded plugin is still in .zip file format, first extract it on your computer and then go to the next step.
In the next step, find the plugin file on your computer that you want to upload to your website in the Local site section.
After you find the file, click the right button of your mouse on it and then click on the Upload option.
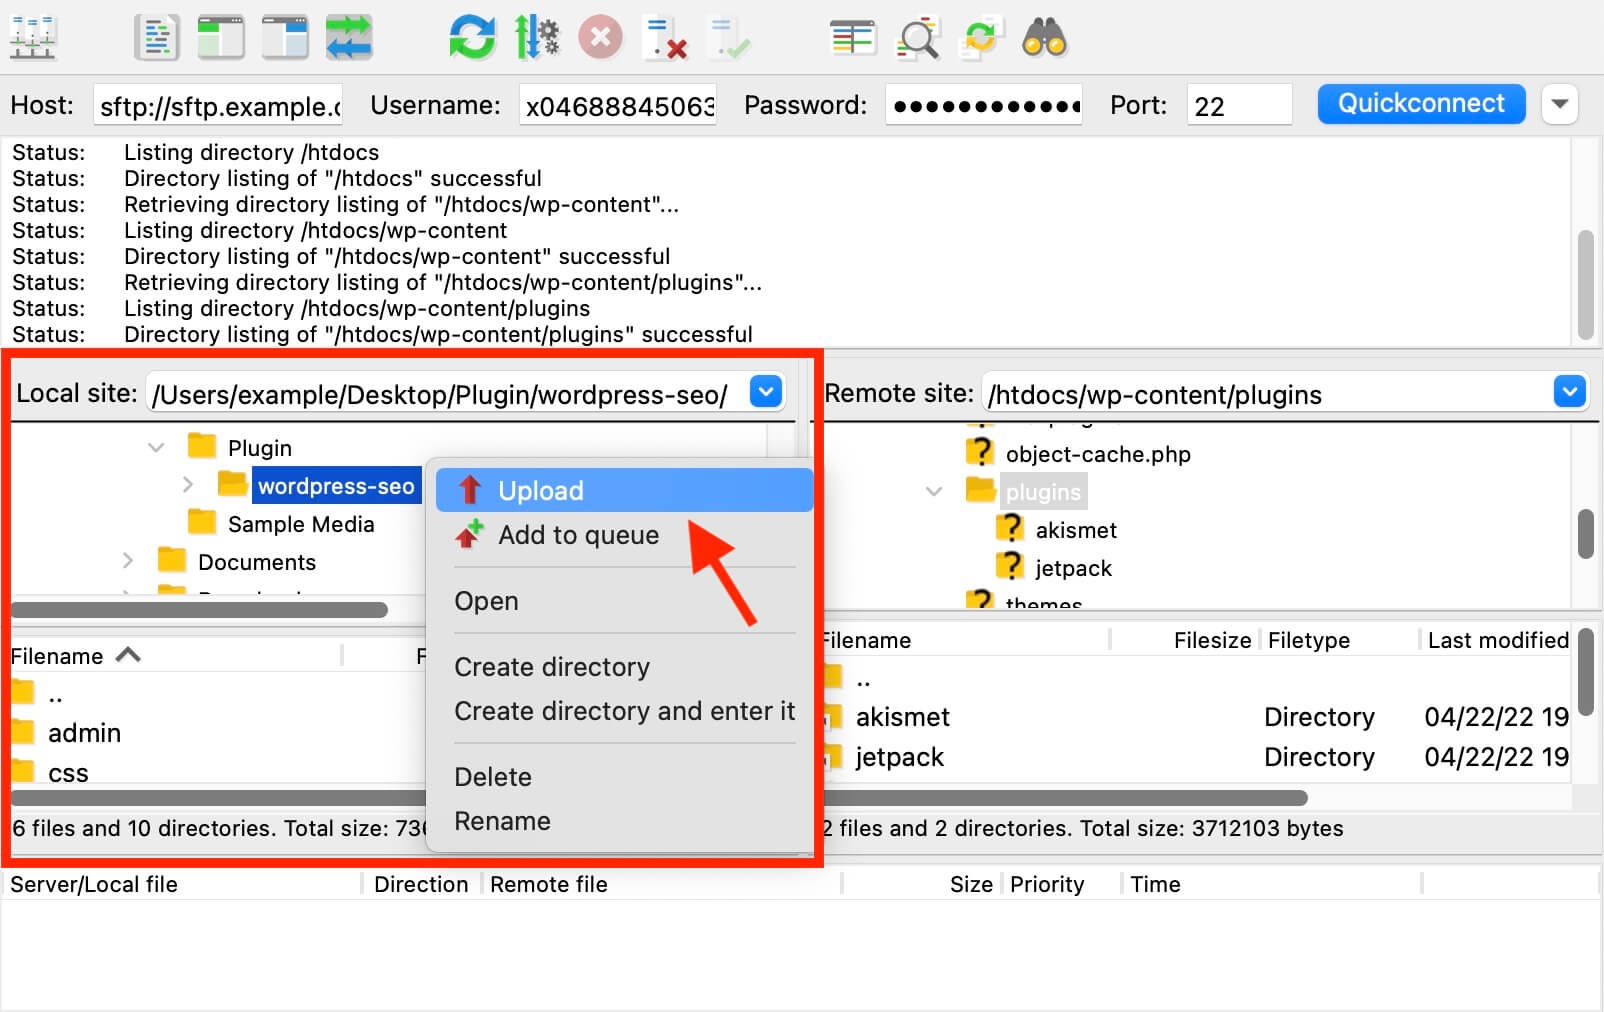
At the moment you click the Upload option, the plugin will start to upload and install on your website.
Once the uploading process is completed, go to your site’s WordPress admin area (if it is already open in your browser, just refresh the page).
You will notice that the plugin is now appearing in the Plugins option of your site’s WordPress admin area.
Now to activate the plugin and make it work on your site, you can activate it by clicking on the Activate option just below the name of the plugin.

4. Install a Plugin by Uploading it from the File Manager Section of Your Hosting Provider
This is a similar method to what I have added in the third method above.
However, for this method, you don’t need any FTP client software, and you can upload and install a plugin from your hosting provider’s dashboard.
But in order to achieve this, your hosting provider should provide a feature to access the site files via the File Manager.
In this method, I have used the “File Manager” wording, it could be possible that your hosting provider has an option with a different name, but it provides the same feature that File Manager does.
Basic requirements for this method:
- WordPress should be installed properly and working on the site address, and the WordPress admin area of the site should be accessible with either Super Admin or Administrator role as a user.
- The plugin should not be in the .zip file format. It should be unzipped/uncompressed and in a normal folder, just like you store files in a folder on your computer.
- You should have access to your hosting provider’s dashboard, and your hosting provider should provide a feature to access the site files via the File Manager or any similar option.
For this method, as a first step, log in to your hosting provider’s dashboard and search for File Manager or a similar option, which provides a way to check site files, and download and upload files as well.
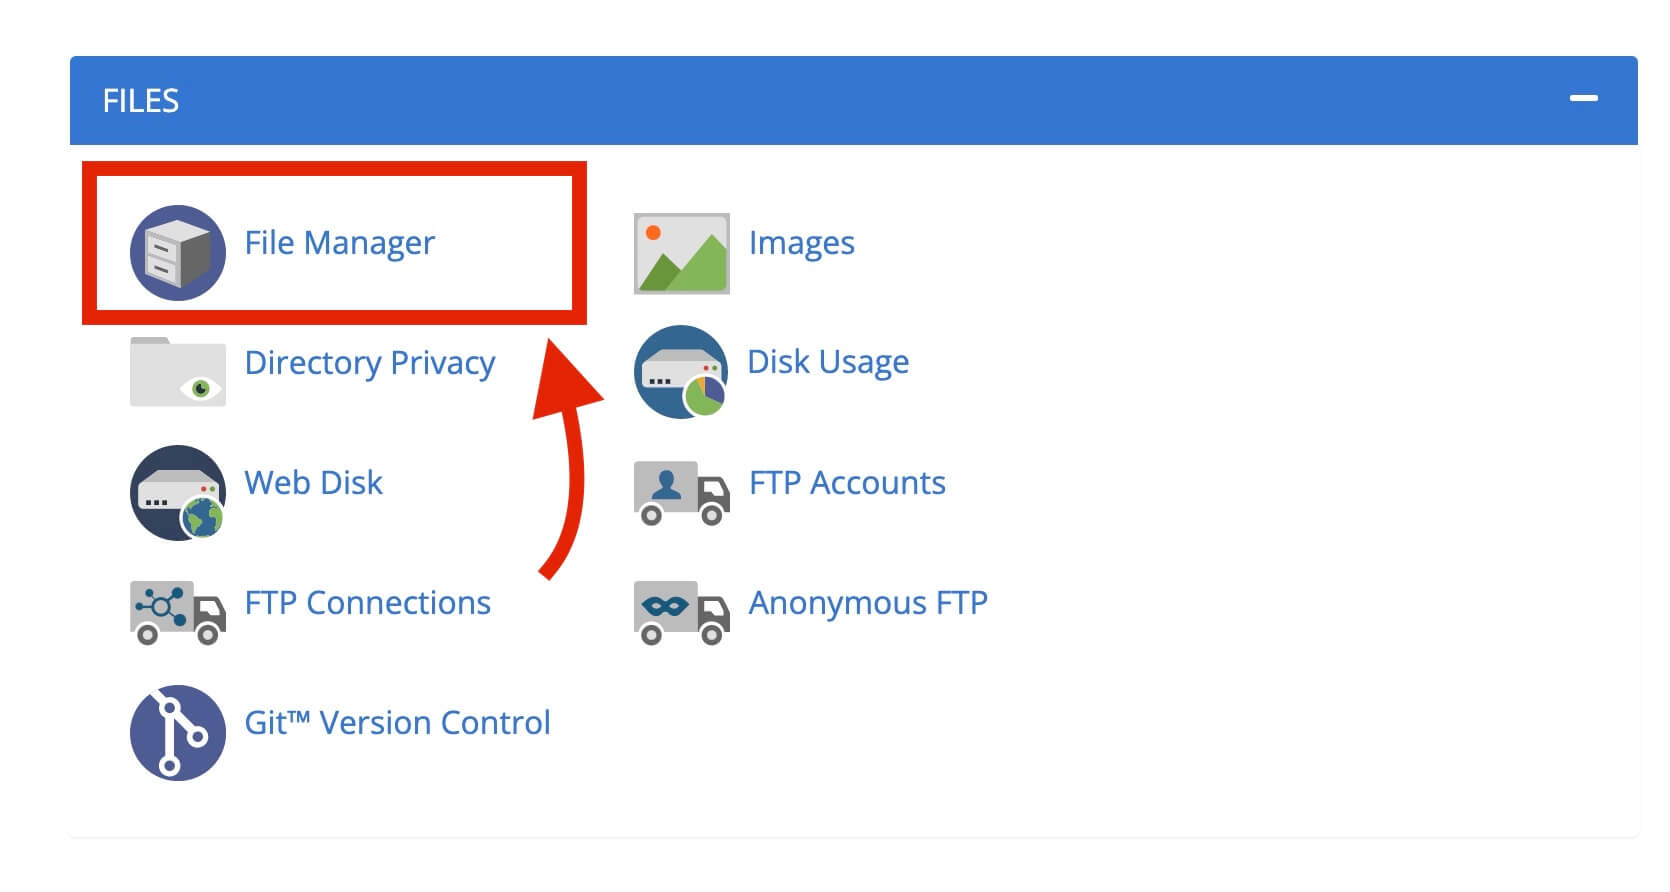
If you are not able to find the File Manager option or having any difficulties, you can contact your hosting provider or check their support article, they will help you out.
They will help you out by letting you know the location of the File Manager, and they will also confirm if they provide a feature to access site files via File Manager or a similar option.
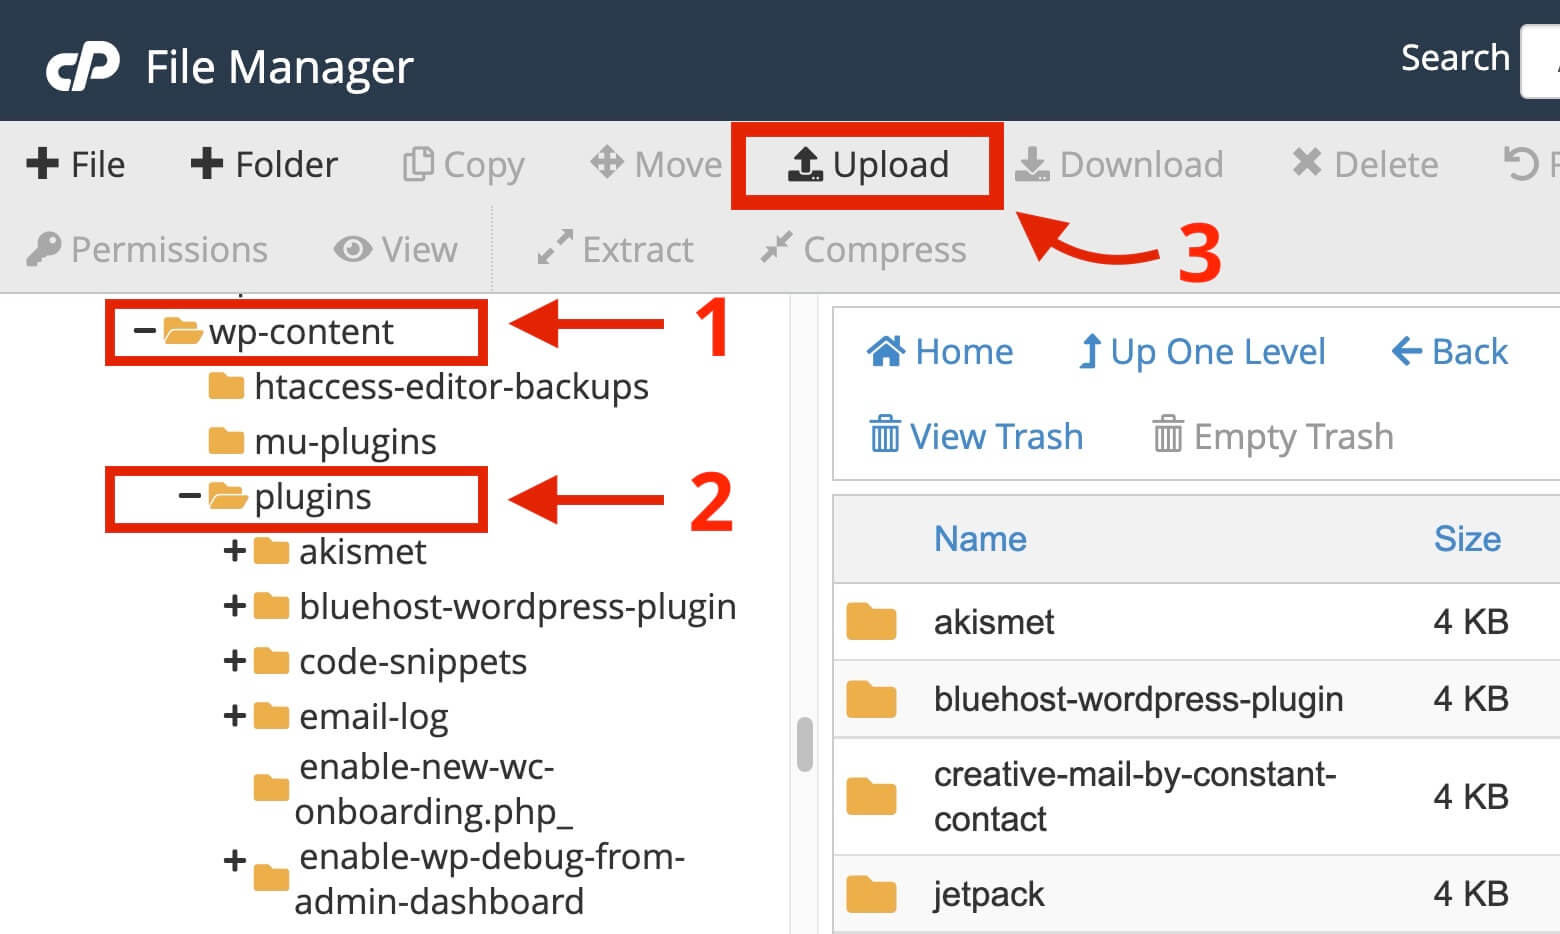
As you will enter the File Manager, you need to go wp-content (1) » plugins (2) folder of the site where you want to install the plugin.
And then, Upload (3) the plugin folder there from your computer.
Once the uploading process is completed, go to your site’s WordPress admin area (if it is already open in your browser, just refresh the page).
You will notice that the plugin is now appearing in the Plugins option of your site’s WordPress admin area.
Now to activate the plugin and make it work on your site, you can activate it by clicking on the Activate option just below the name of the plugin.

Frequently Asked Questions
What are WordPress Plugins?
WordPress plugins are a set of tools that can be used to extend the functionality of a WordPress site by adding additional features. They can make your site more interactive and help you reach a wider audience.
Are WordPress Plugins Free?
Plugins that are available in the WordPress plugin directory are free. Some of them are free with limited features, and you may need to purchase them to unlock all the features fully. However, plugins available outside the WordPress plugins directory can be fully free, freemium, or completely paid plugins.
How Many Methods can I Install a WordPress Plugin?
You can install a WordPress plugin by four methods. Here are those:
- By searching it in the WordPress plugin directory.
- By uploading it from the WordPress admin area.
- By uploading it from the FTP Client Software like FileZilla.
- By uploading it from the File Manager section available on your hosting provider’s dashboard.
Are WordPress Plugins Safe to Install on a Site?
Plugins that are available in the WordPress plugin directory are safe to install on your site. If you want to download and install WordPress plugins outside of the WordPress plugin directory, you should always download them from trusted sources/sites.
How do I Uninstall a WordPress Plugin?
In order to uninstall a plugin go to your WordPress admin area » click on the Plugins option (available on the left sidebar of the admin area). After that, under the plugin that you want to uninstall, click Deactivate, and then click Delete.
How Many WordPress Plugins Should You Install?
You can install as many plugins as you want on your site. There is no hard and fast rule defined on the maximum number of plugins a site should have. It is not like the more plugins you will install, your site speed will decrease. But if a plugin is poorly coded, then it can definitely decrease the site speed.
For example, if you have 30 good-quality plugins installed, it will not affect your site, but if you have 2 bad-quality plugins installed, it can definitely affect your site. Also, make sure to install plugins from trusted sources/sites only.
How to Identify Which Plugin has Good Quality?
You can get an idea about the quality of the plugin by:
- Taking a look at the rating of the plugin
- Checking how many downloads or how many sites the plugin is active
- Checking what users are saying about the plugin in the review section
- Searching for the plugin on the internet and what people say about it
And if the plugin is very new, then getting some of the above data could be difficult, but still, you can make sure the site from where you are downloading the plugin is trusted and make sure your site performance has not decreased after installing it.
Conclusion
In this post, we learned four methods to install a plugin on a WordPress site.
The first method we learned to install a plugin is by searching for the plugin in the WordPress plugin directory by going to Plugins » Add New option in the WordPress admin area, then installing and activating it from there.
This is also one of the easiest ways to install a plugin, but to use this method, the plugin should be available in the WordPress plugin directory.
The second method we learned to install a plugin is by uploading the plugin file in .zip format by going to the Plugins » Add New » Upload Plugin option in the WordPress admin area.
This method can be used to install any WordPress plugin and is helpful if the plugin is not available in the WordPress plugin directory.
The third method we learned to install a plugin is by uploading it using the FTP client software, like FileZilla, and then activating the plugin by going to the Plugins option in the WordPress admin area.
For this method, the plugin file should be unzipped/uncompressed and in normal format (it should not be in .zip file format).
The fourth method we learned to install a plugin is by uploading it from the File Manager or a similar option available on your hosting provider’s dashboard and then activating the plugin by going to the Plugins option in the WordPress admin area.
For this method as well, the plugin file should be unzipped/uncompressed and in normal format (it should not be in .zip file format).
I hope this article helped you with the installation of the WordPress plugins.
Question for you:
- Which methods of installing WordPress plugins have you found easy?
Let me and other users know below in the comment section.

